Tuesday, July 24, 2018

A Carpenter’s Son – Farmhouse Renovation: Part 1

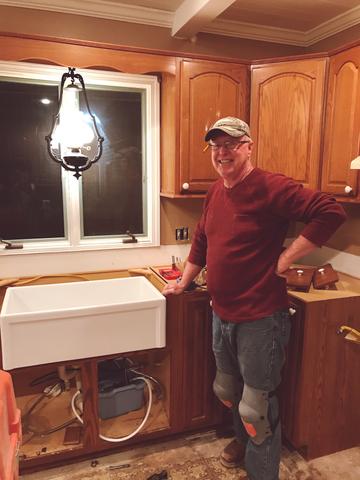
Our friends, Josh and Laura, over at A Carpenter’s Son Design Co. recently took over our Instagram for the day to share the process of renovating their 1800’s farmhouse. Josh started A Carpenter’s Son in 2015, solely as a platform to sell woodworking craft pieces and furniture to raise money for their upcoming domestic adoption. Working hard to use the woodworking business to offset the domestic adoption fees, their Etsy shop and Instagram following exploded. After successfully raising the funds to adopt into their family, the company is continuing to grow and build for a purpose. They continue to raise money for other families to adopt and families who have previously adopted. Stay tuned to see how this farmhouse comes to life with copper and fireclay sinks from Sinkology and a little love from this creative family!


In late spring, we had a crew rip out everything in a new-to-us farmhouse near Columbus, Ohio. When we got down to the studs, we could see that the original part of the house was constructed in the early 1800s. We have fallen in love with the character of this old house, the hand-hewn 10×10 walnut beams that frame it, and the pile of rocks that were the original foundation. We have considered the other families that have lived within its walls, and the ones who painstakingly built it about 200 years ago. I often think about their wash basins, outhouses, and fireplace cooking.


Scheutzow_family

The Scheutzow Family


Our family of 6 has taken on the modern “covered wagon” by living in a 360sq ft camper on the property while the renovations take place, and we are thankful that we still have running water and air conditioning. It’s a good practice in gratitude and perspective to consider what life was like for the original family who settled this land while we live here and work hard on making this house into our dream house.

Renovating an entire house is overwhelming! We are not doing all of the work ourselves, but the number of decisions to be made is… a LOT! From layout to window and door styles, light fixtures to how many drawers to put in the kitchen, we are finding ourselves weeding through a list of endless choices. One thing we knew we wanted from the beginning was a deep soaking tub. When we found Sinkology’s Copper Bathtubs, we fell in love. This will definitely be a centerpiece in our master bathroom. The tub has sparked our interest in all things copper, and has really helped us to set the tone for styling our home.

euclid-copper-tub-family-fun


The new kitchen will be the heart of the house – we have 4 boys after all! It will feature the Rockwell Copper Farmhouse Sink, surrounded by dark blue cabinetry and a light quartz countertop. The sink will be accented by oil rubbed bronze and black hardware and copper pendant lights over the island. The island will have a wooden waterfall top built by Josh and room for family and friends to gather around it on stools.

The post A Carpenter’s Son – Farmhouse Renovation: Part 1 appeared first on Sinkology.


source http://www.sinkology.com/blog/a-carpenters-son-farmhouse-renovation/

Thursday, July 19, 2018

Farmhouse Sink Dreams Come True

Our friend, Amy, over at  Maison De Mings recently renovated her kitchen with one of our new Bradstreet fireclay farmhouse sinks from Sinkology and she has been so grateful to share her collaboration story for the full story behind a fireclay renovation.


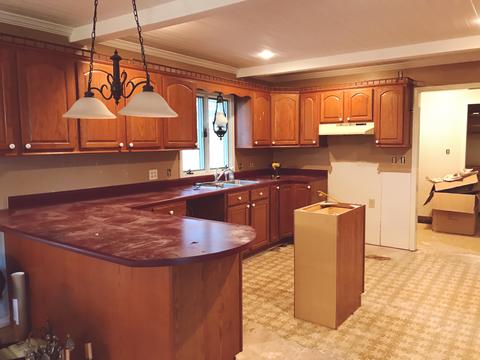
Hi friends! If you’ve been following along, you know that we have been renovating the home we just purchased over the last few months. When we first looked at this home, I loved how open the kitchen was and all the cabinet storage and countertop space it offered, but it was a bit outdated and definitely didn’t fit our style. I told my husband my only “must have” was a farmhouse sink. We also agreed that the maroon countertops had to go. 

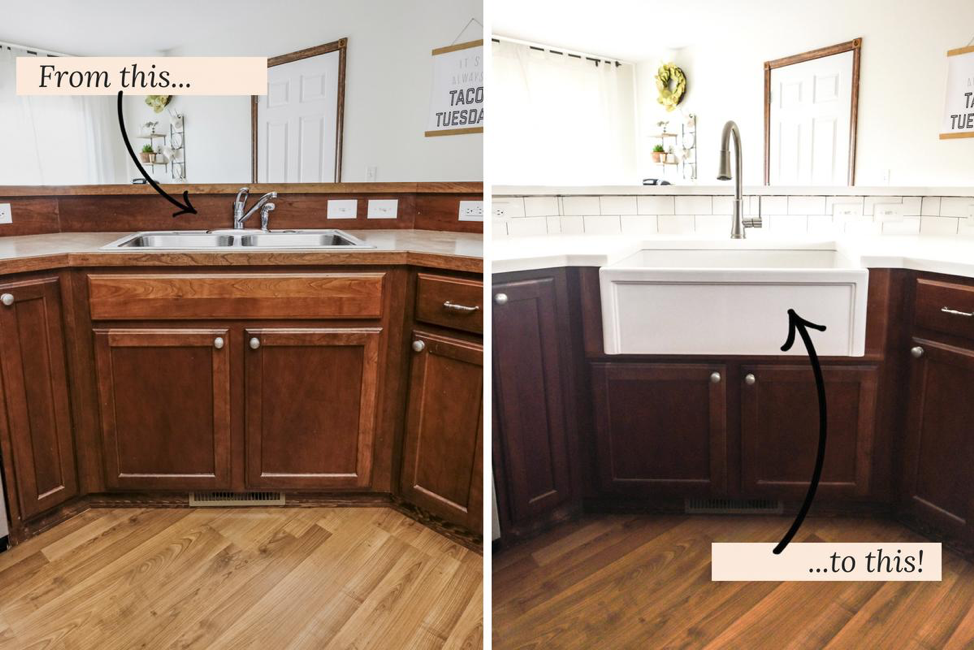
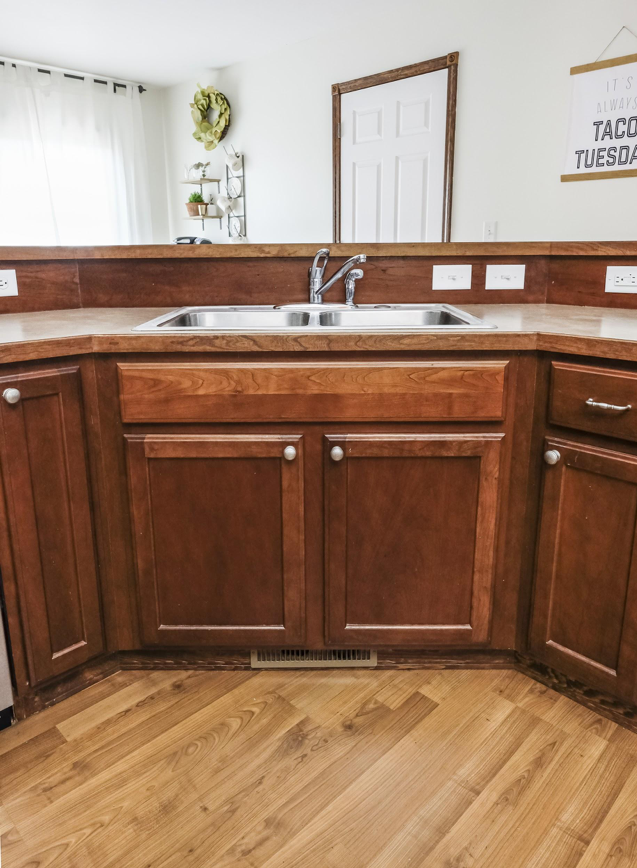
Kitchen Before

Kitchen-remodel-before-and-after


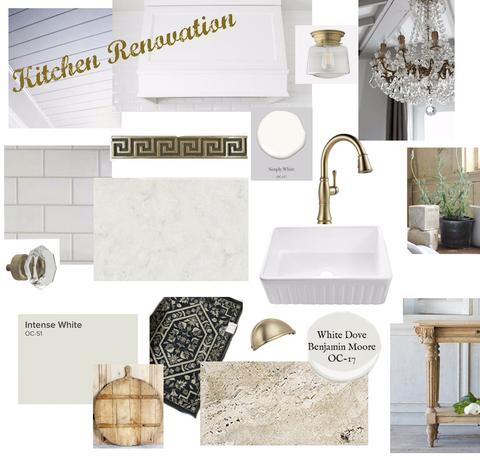
My husband and I are very visual people so I put together a design board to incorporate all our ideas for the kitchen renovation. 

design-concept-fireclay-remodel


As you can see, we planned to lighten up the room and add some French Country charm to make it more inviting. We’ve always spent a lot of time in the kitchen and now that we are finally back “home,” I knew we would be having friends and family over on a regular basis. 

I’m planning to do a full kitchen “before” and “after” blog post soon, but today I wanted to go ahead and share about my favorite addition to the space – my farmhouse sink!!  

If you’ve been following me for very long on social media, I’m sure you’ve already seen my glorious farmhouse sink from Sinkology. You guys, I am so in love!  For today’s post though, I want to take you behind the scenes back to when the sink was delivered and how we installed it.

The day the sink was delivered it was lightly snowing in Southern Illinois.

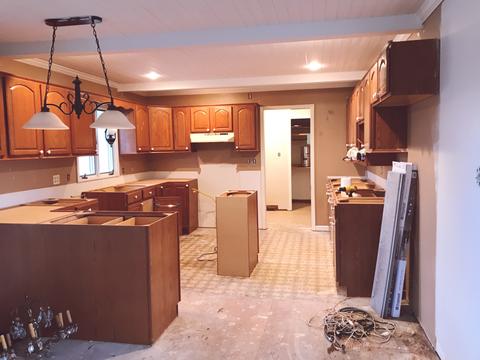
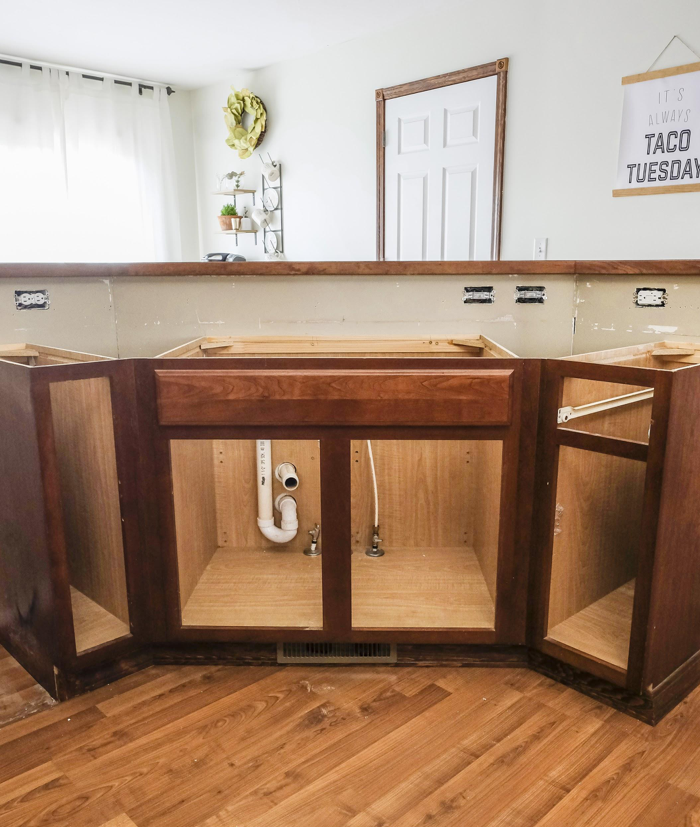
We decided to get new quartz countertops in the kitchen so before we installed the sink, we removed the old laminate countertops and stainless sink.

kitchen-demo-day


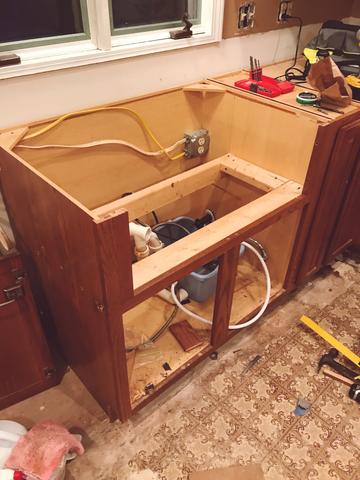
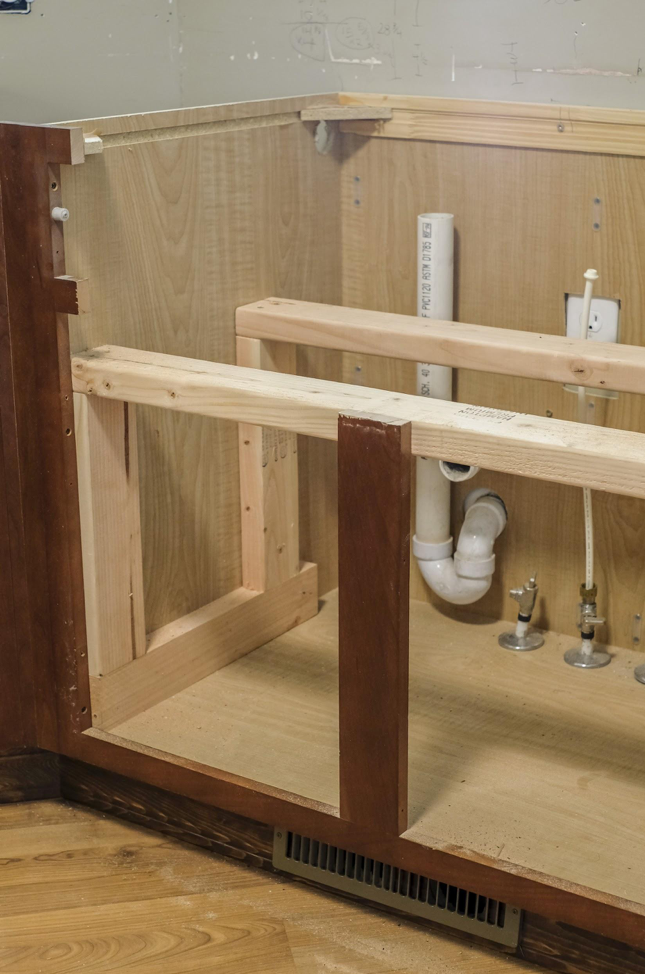
Our contractor friend, Gary Roberts, assisted us with building a base for the undermount sink as shown below.

support-fireclay-farmhouse-sink


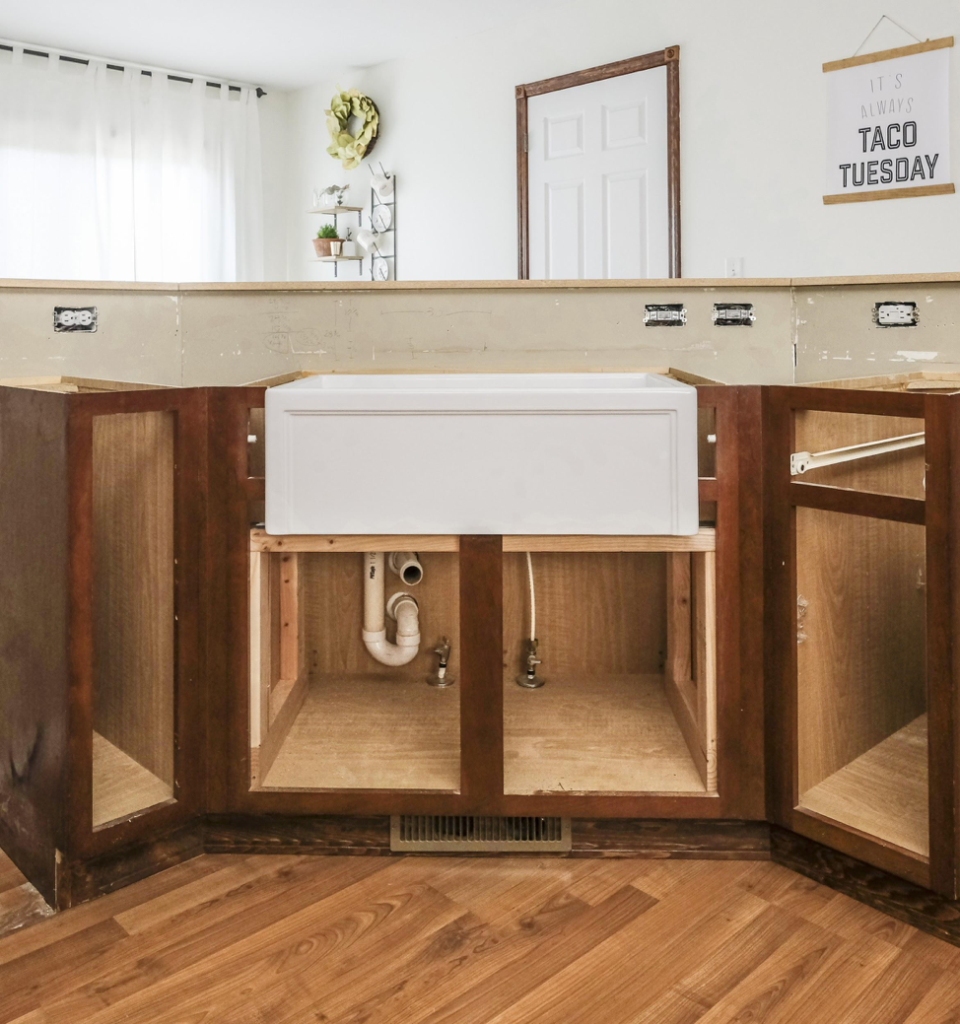
Once the base was built, we brought in the farmhouse sink. Gary did an excellent job and the sink was a perfect fit! 

fireclay-sink-placement


At this point in the renovation process, we were just getting started. We still had to paint the cabinets and install flooring, countertops, appliances and the faucet.  

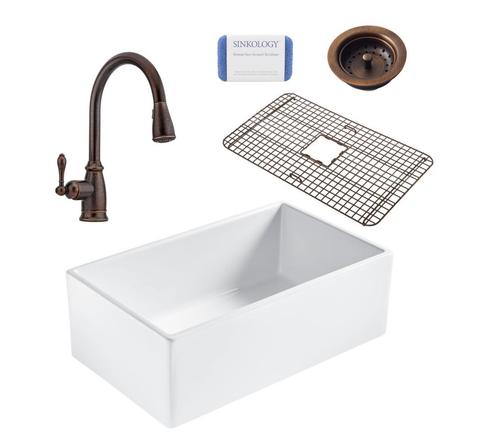
I mentioned above the farmhouse sink was by Sinkology, but it actually came as an all-in-one kit with Pfister rustic bronze faucet and drain. It’s available for purchase at Home Depot. Click here to view. 

 Bradstreet II All-in-One Farmhouse Fireclay 30 in. Single Bowl Kitchen Sink with Rustic Bronze Faucet and Drain

all-in-one-kit-fireclay-farmhouse-rustic-bronze


Once we had the new flooring installed and cabinets primed, I started to see my designs come to life. 

The post Farmhouse Sink Dreams Come True appeared first on Sinkology.


source http://www.sinkology.com/blog/fireclay-farmhouse-sink-dreams/

Tuesday, July 17, 2018

Elements of Design: Fun Bathroom Flooring

Sinkology is proud to present Kristan Allen, our design expert and guest blogger who runs the @FarmhouseRedefined Instagram. Kristan is here to share some design ideas and inspiration around designing your home around your copper sink.


Elements of Design: Fun Bathroom Flooring

I’m bringing back the Elements of Design series this month to talk about something that I’ve been focusing on a lot lately…bathroom floors.  I’m starting to map out our basement finishing project and I thought I had a pretty clear vision for each room.  But when it came time to start thinking through the bathroom, I found myself torn between flooring options!

Gone are the days when flooring was supposed to blend into the background, quiet and unassuming.  With so many different types of flooring out there, it can easily be one of the key focal points in a room.  I’ve been sifting through a ton of photos, style boards, and tile samples…and I’m getting close to narrowing my choices down.  In the meantime, I thought I’d share a few favorite bathroom floors and inspiration photos.  Check ’em out!


Penny Tile

What goes around comes around, right?  Penny tile is making a big comeback in bathroom floors.  It channels that retro vibe, but it’s easy to give it a fresh, updated feel.  I love this bathroom from a recent HGTV home renovation…the mix of black and white penny tile strikes the perfect balance between vintage and modern.  Plus, the pops of black keep the bathroom from feeling too monotone.  


Hex Tile

Hex Tile_Brooke Wagner Design

Hexagons used to give me the chills…who else hated geometry in school?  But now, they’ve captured my heart.  Hex tiling comes in a variety of sizes, so you can scale it to any bathroom.  The smaller, 2″ marble hex tiles in this bathroom by Studio McGee remind me of an iridescent mermaid tail.  Please tell me I’m not the only one!  Their understated elegance pairs perfectly with those pale blue-green walls and off-white cabinets.  Such a calming space!  Conversely, the oversized hex tiles in this bathroom by Brooke Wagner Design create a cool honeycomb pattern that off-sets the rustic stool and neutral cabinets.  The darker grout helps to define each tile, making the overall “pattern” of the floor bolder.


Encaustic Tile

Encaustic Tile_Fabienne de la Fraye

Encaustic tile has bold patterns that are typically made with different colors of clay and not just a glaze on top.  Sometimes they’re subtle in color, other times they’re bold…but they always add a touch of drama with a global feel.  This space by Mosaic House uses their Madera tile in quiet cream and gray colors, which makes the pattern beautiful and dainty.  It’s the perfect partner for that clawfoot tub!  For something a little “spicier,” I was immediately drawn to this bathroom by Fabienne de la Fraye.  That eye-popping pattern adds such a punch…especially since it’s carried up from the floor to the walls.  The black tub and raw wood ledge tone it down juuuuust enough.


Wood-Look Tile

Wood-Look Tile_Sloan Architects

I actually have wood-look tile installed in my laundry room and master bath.  I was a little hesitant with my choice at first, wondering if it would look natural.  Three years later, I’m thrilled with the way it turned out.  It looks amazing and it’s so easy to maintain!  Wood-look tile comes in a ton of different sizes, widths and colors…so it’s versatile and easy to tailor to your style.  This bathroom by Sloan Architects stopped my Pinterest-scrolling fingers in their tracks.  I love the soft warmth the floors add.  It’s a nice balance between the neutral cabinets and cool gray walls.  The wider “planks” of the floor give it a rustic, weathered look.


If you have any additional questions during your quest for farmhouse fireclay kitchen sinks or decor, our Sinkologists are here to help. Contact us or follow us on FacebookHouzzPinterest, or Instagram for more helpful tips and design ideas.

The post Elements of Design: Fun Bathroom Flooring appeared first on Sinkology.


source http://www.sinkology.com/blog/elements-of-design-bathroom-flooring/

Thursday, July 12, 2018

Summer Zucchini Lasagna (low-carb style)

Sinkology is proud to present Emily Schuermann, our food-loving guest blogger who runs Food for a Year. Emily is here to share some recipes she has created exclusively for the Sinkology blog that reflect her view of a copper sink: simple, timeless, affordable, and beautifully rustic.


It’s officially summer-time, right? Here in Oklahoma, we’ve had our share of summer thunderstorms, a few really hot days and the vegetable garden is growing by leaps and bounds. Thanks to an unusually cool May, most of the veggies are just starting to appear but that summer squash is going crazy.

One of my favorite ways to use summer squash and zucchini is to turn it into noodles using a vegetable spiralizer and make a quick and simple zucchini lasagna. If you don’t have a spiralizer, just thinly slice the zucchini & squash length-wise. A bonus of this recipe is that it’s low-carb! 

One tip in making the assembly of this recipe so speedy is to do a lot of the preparation ahead of time. Spiralizing and refrigerating the zucchini/squash, browning the Italian sausage and even making the ricotta filling can be done one to three days ahead and makes a big difference in dinnertime prep. I assembled these mini lasagnas in less than 15 minutes, thanks to working ahead!

Keep on mind the zucchini inherently has a lot of moisture stored within it and will release that moisture during the baking process. With that in mind, I found it important to use a thick marinara sauce for this lasagna.

Making individual lasagnas is another inside tip. This recipe is not only easy to assemble, it’s also easily adaptable — swapping and omitting ingredients to fit a vegetarian or even vegan lifestyle. Individual lasagnas allows you to easily cater to your guest’s dietary preferences. (I’ve also made one large lasagna using this recipe and it’s turned out great — BTW cooking time remains 35 minutes).

As these lasagnas cook, the juices from the zucchini blends with the marinara & Italian sausage. The cheeses get all gooey and golden and my favorite part :: the edges get all chewy and crisp.

And let me tell you, with that first bite you’ll totally forget that the pasta is missing. This lasagna is so flavorful thanks to the richness of the cheeses and Italian sausage. And a real bonus for you low-carbers?! Guilt-free eating! 

Zucchini Lasagna
Serves 4
Write a review
Print
Prep Time
20 min
Cook Time
35 min
Prep Time
20 min
Cook Time
35 min
Ingredients
  1. 1 medium zucchini*
  2. 1 medium yellow squash*
  3. 1 approx 20 oz jar marinara sauce
  4. 1 lb cooked Italian sausage ground and browned
  5. 8 oz Monterey Jack cheese, grated
Ricotta Filling
  1. 16 oz ricotta cheese (I prefer whole milk)
  2. 3 T fresh herbs, finely chopped**
  3. 1 egg
  4. 1 t sea salt
  5. 1 t finely ground black pepper
Instructions
  1. Preheat oven to 375°. Prepare ricotta filling by combining the filling ingredients in a medium mixing bowl. Using 4 individual bakers (as pictured) or an 11" x 7" glass baking dish, layer ingredients, starting by spraying the dish (or dishes) with a non-stick cooking spray.
  2. Begin assembling the lasagna by placing a thin layer of marinara in the bottom of the pan, followed by a layer of zucchini/squash slices, ricotta mixture, marinara, sausage and cheese. Repeat the layers until the dish is full being sure to have enough cheese remaining to sprinkle over the top. Top with remaining shredded cheese and place into the preheated oven. Bake for 30-35 minutes. Once baking time is complete, adjust the oven setting to broil and broil for 1-2 minutes until the cheese is light golden brown.
  3. Once cooking is complete, remove from the oven and allow to cool for 5-10 minutes before serving.
  4. Serves 4-6
Notes
  1. *Thinly sliced length-wise or using a spiral vegetable slicer.
  2. ** I used a combination of Italian parsley, thyme, chives, oregano and rosemary.
Adapted from Food for a Year
Sinkology http://www.sinkology.com/

The post Summer Zucchini Lasagna (low-carb style) appeared first on Sinkology.


source http://www.sinkology.com/blog/summer-zucchini-lasagna-low-carb-style/

Saturday, July 7, 2018

Fireclay Farmhouse Kitchen Sink Step-By-Step Installation

Sinkology is proud to present Ashley Carpenter, a homebody, decor obsessed, DIYer that loves fitness, happy people and wants nothing more than to be on the lake soaking up the sun with good people and good music. Ashley runs the blog Joyfully Growing and is here to share her recent kitchen remodel with us, and the installation of her new Bradstreet II Fireclay Farmhouse Sink. 


Adding an apron front farmhouse sink to your kitchen will not only elevate the overall feel of the room, but the functionality can’t be beat! Installation can be a bit tricky, however, so follow this step by step tutorial to add some farmhouse flair to your kitchen.

1-before-after-fireclay


How to Install a Farmhouse Sink

Prep the Area

To get the sink ready for removal, turn the water lines off (there are usually two valves inside the base cabinet under the sink). 

Disconnect the fittings and remove the water lines. Remove the drain pipe under the sink. Use a small bucket or a towel to catch the water inside the P-trap as you remove it.

2-before-fireclay-sink-install

Remove countertops

First, remove all of the lower cabinet drawers, doors, and all contents. 

Next, remove the screws in the base cabinets that are holding the countertops to the cabinetry. 

Then use a utility knife to cut through the silicone beads to help free up the countertops.

4-remove-kitchen-countertops

Most laminate countertop removals can generally be handled by one or two people.  But, if you have tile, concrete, or stone countertops, you’ll want to get as many friends as possible to help lift.


Build a support frame

Most farmhouse sinks are extremely heavy, and the Sinkology Bradstreet II Fireclay sink we used is no exception. Around 85 pounds! While that may make it a little more difficult to handle, it makes up for it in durability!

To install the sink properly, you’ll need to build a frame out of 2x4s to support the weight.

To retain as much usable cabinet space as possible, we built the frame by screwing 2x4s right to the sides of the base cabinet. This kept the framing from eating into the storage space below the sink.

fireclay-sink-support-frame

For an ‘undermount’ sink, the top of the sink needs to sit ⅛” under the countertop. To determine how tall your framing needs to be, measure the inside height of the cabinet, minus the height of the sink, minus ⅛”. 

Lastly, make sure the 2×4 frame is a tight fit behind the cabinets. You will need to mount a trim board to this 2×4 in a later step.


Cut existing cabinets

This part can be a little intimidating, but it’s actually pretty easy.

Remove the false front panel (the fake drawer under the old sink). They are usually held in place with little spring clips – just pull hard to remove.

(Important: save the false front panel to use as a trim board in a later step.)

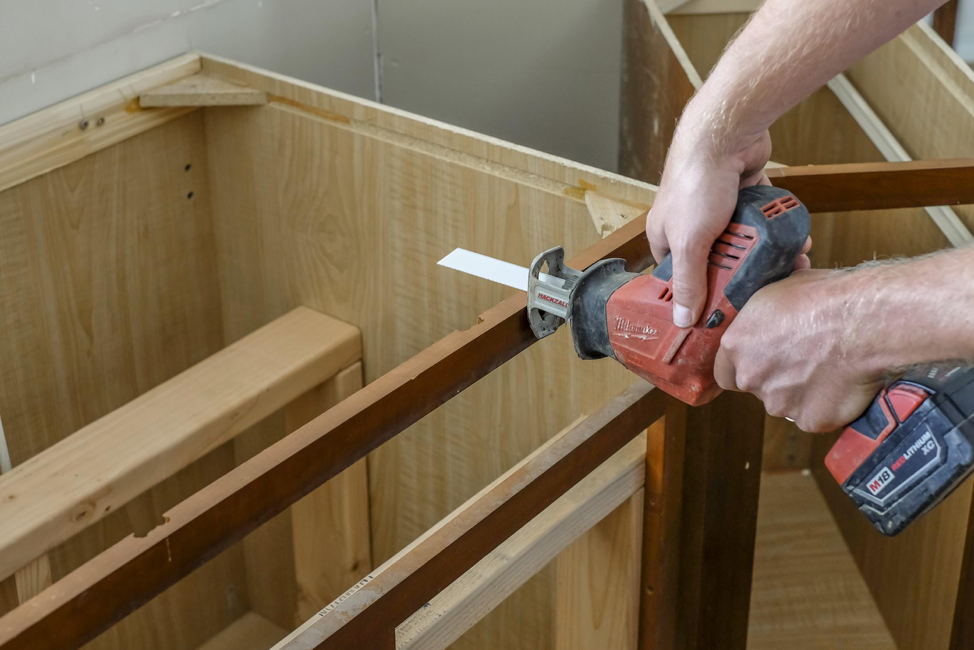
Carefully measure and mark the front of the cabinet where the new farmhouse sink will protrude through the front.  Plan for a ¼” gap on either side of the sink to give yourself a little wiggle room.

These cuts do not need to be 100% perfect because the gaps will be covered up with a trim board. 

Double check your measurements to be sure the sink will be centered before you cut! If everything looks good, start cutting!

Keep the pieces you remove. They will be repurposed after the sink is installed.

cabinet-prep-sink-installation


cabinet-firecaly-sink-prep


Install the sink

Now that you have a frame in place and a cutout for the apron front, all you need to do is slide the sink right in.  For now, the sink just rests on top of the framing – no need for fasteners or adhesive.

fireclay-farmhouse-sink-kitchen-remodel

The ¼” gaps on both sides of the sink leave room to make final adjustments when the countertops get installed.

Use a level to make sure the sink is even in all directions so that water will drain properly.  If needed, adjustments can be made with shims.

 
Install countertops

We hired professionals to install our new countertops (LG Hi-Mac solid surface countertops in ‘Arctic White’). 

If you plan on hiring a pro, make sure you contact the installer BEFORE you remove the old countertops & sink.  They will want to come measure everything before you start any demo work.

Our countertop installers used silicone to seal the seam between the underside of the countertops and the top of the sink.  Once the silicone dries, it also holds the sink firmly in place.


Reconfigure base cabinet

Make sure to wait until the silicone has fully dried and cured before you resume work on the sink/cabinets (usually 24 hours).

Using the wood you saved from step #5, install the new top of the base cabinet. 

The post Fireclay Farmhouse Kitchen Sink Step-By-Step Installation appeared first on Sinkology.


source http://www.sinkology.com/blog/fireclay-farmhouse-sink-installation/