Tuesday, December 25, 2018

The One Thing That Adds So Much Character

Our friend, Tanya, over at Mama of Three Cubs recently renovated her kitchen with one of our Camille all-in-one granite composite sinks paired with a Stainless Steel Zuri single handle pull-down sprayer by Pfister Faucets. She has been so grateful to share all the amazing details in this modern farmhouse kitchen renovation reveal!


Did I mention before how much I love my new sink ? I use it not only for cooking and washing but to give baths to my little guy. Sinkology added so much character to my kitchen . Camille drop-in granite composite sink is perfect size and design . It’s about 33”x 22” x 9”in size . The bowl is perfect to stack lots and lots of dirty dishes and great in fitting two twins for their bubble bath.

We did our kitchen remodel about 8 weeks ago now and I can’t say enough how much my family and I are in love with this sink . Granite sink has clean lines and a perfect smooth matte finish. Camila drop-in granite comes from Sinkology new Journey collection . Journey collection will easily blend with any kitchen look (modern, bold kitchens and transitional kitchens .) Journey sinks balances contemporary designs with beautiful details.

child bathing in sink.

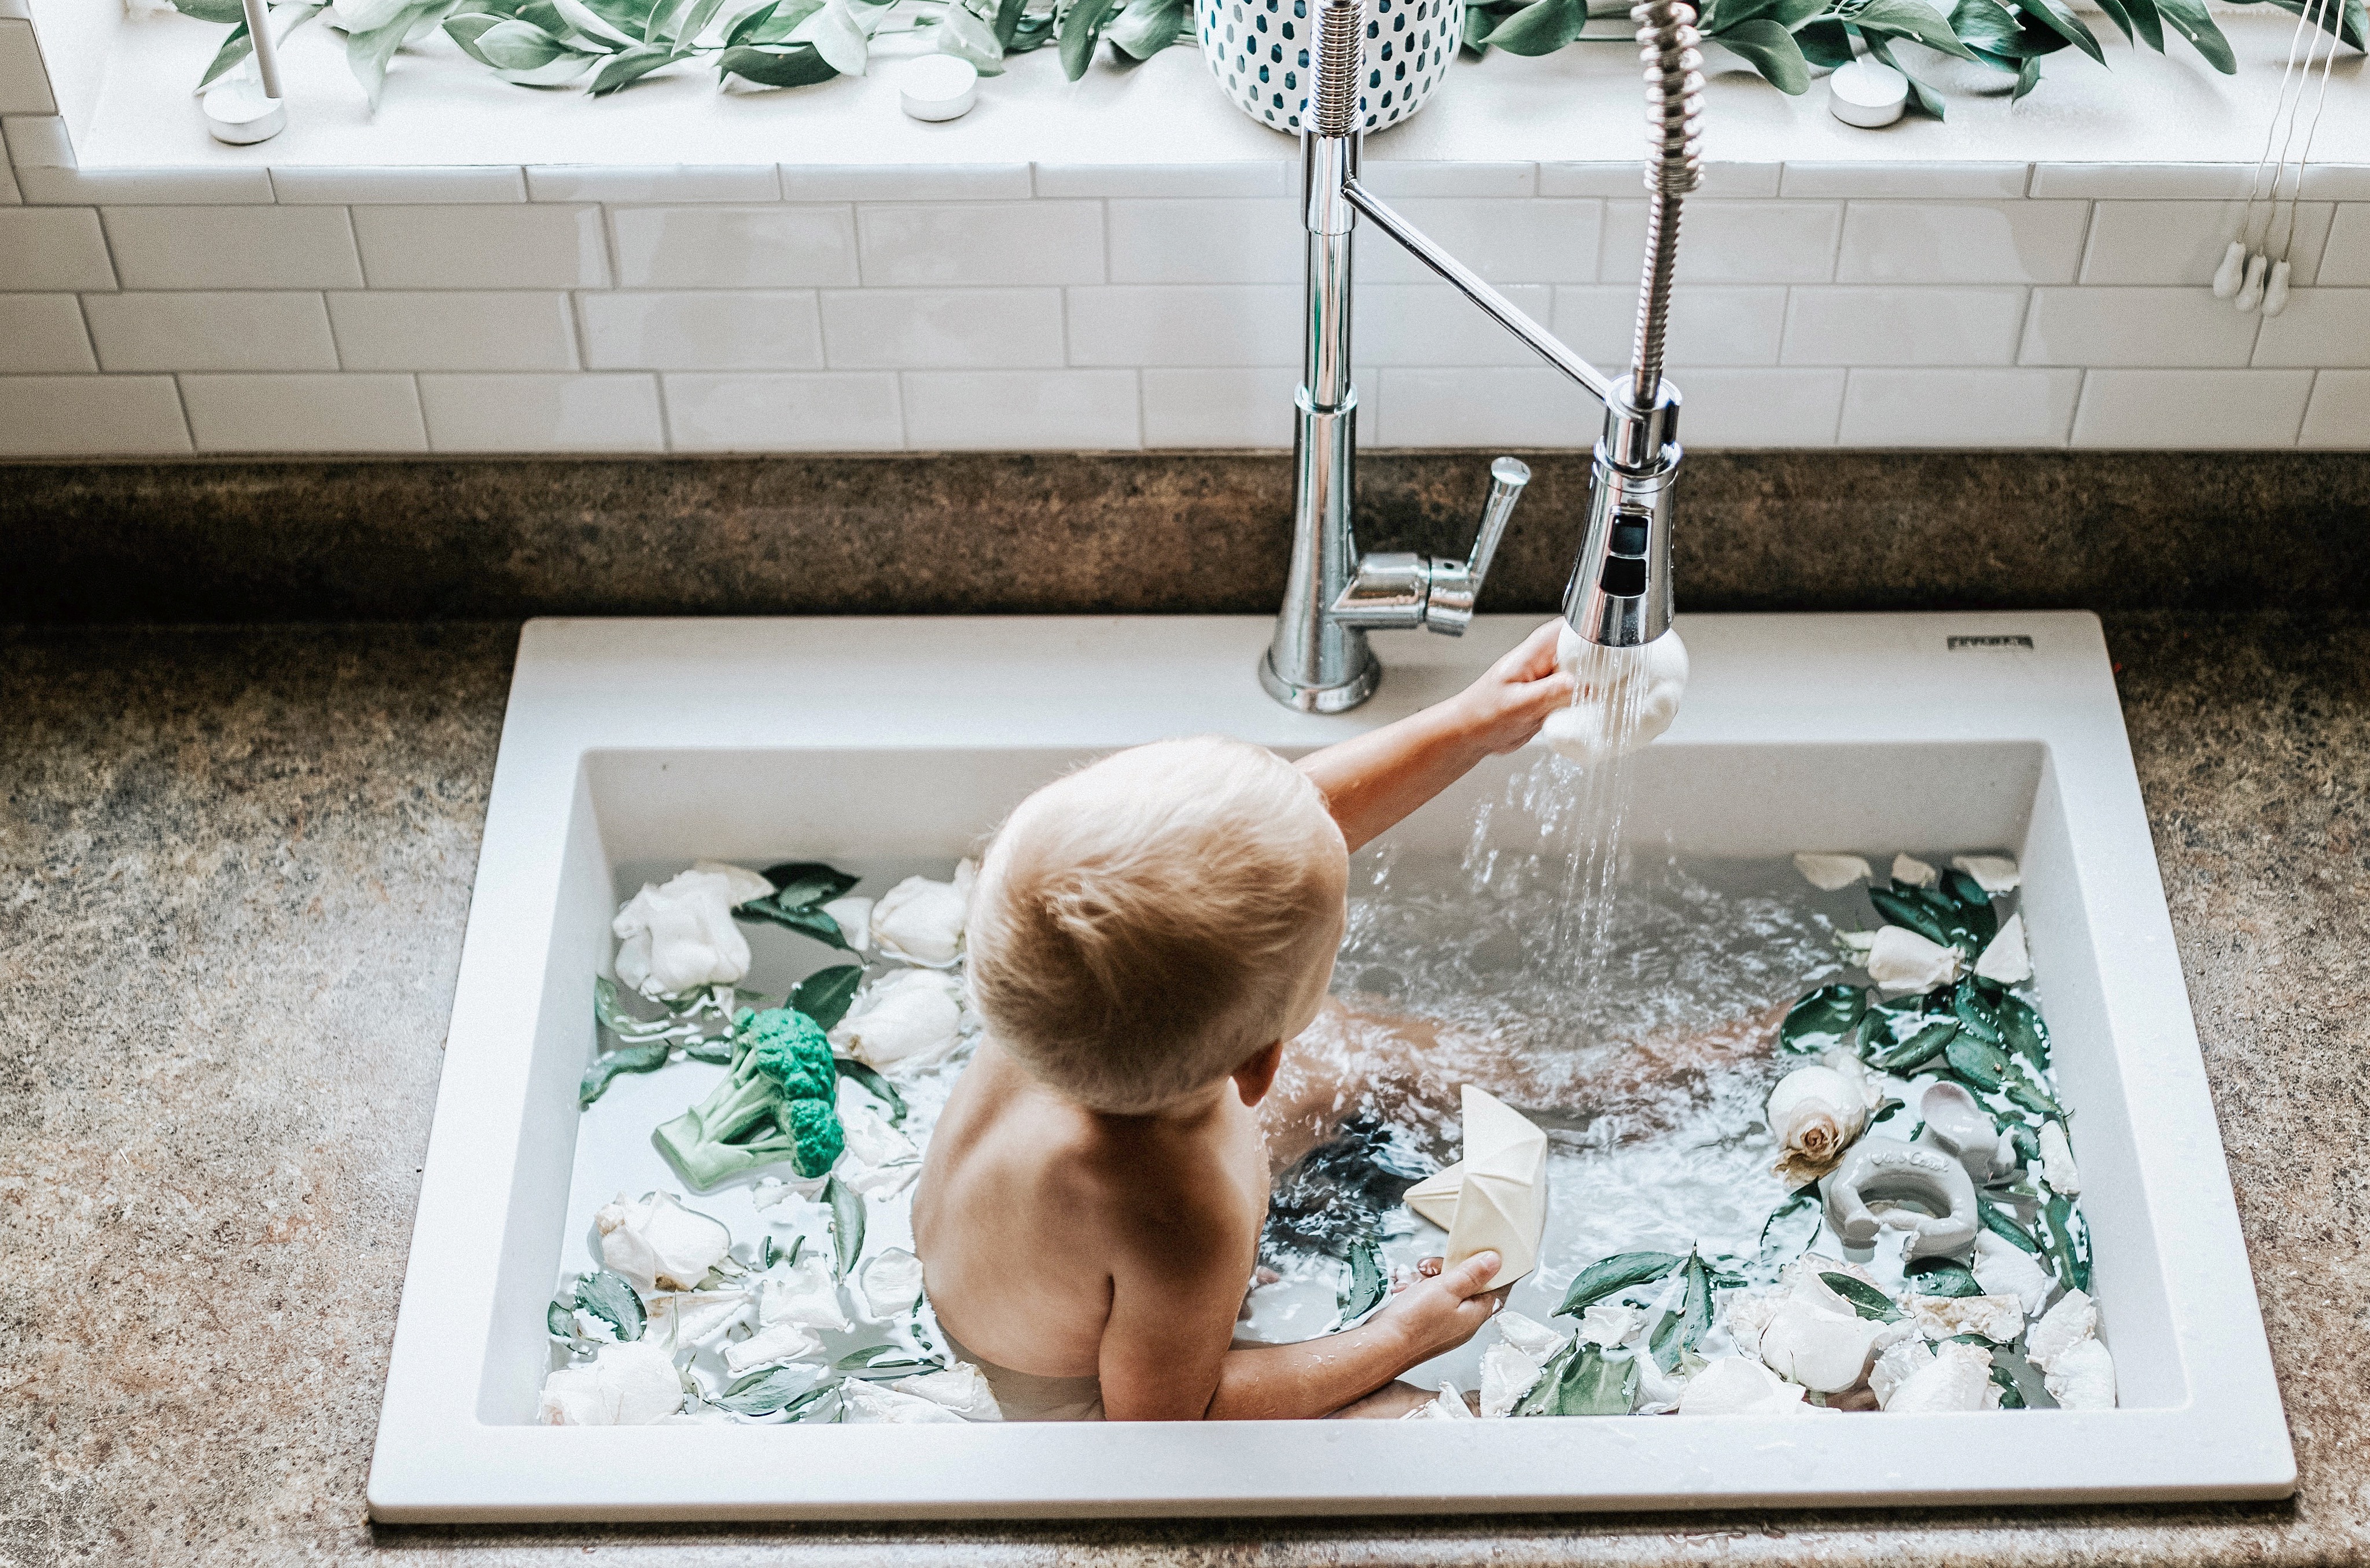
I love the depth of this sink. I’ve been stacking dishes without a problem of them overflowing onto my counter . My kids have been extra excited in helping me wash them too. Isn’t a win/win situation. I think my youngest son is more in love with sinkology though . Every time I turn on the faucet he pulls up a chair thinking its time to wash hands or better yet bath.

Children washing dishes at kitchen sink

When we were planning a kitchen remodel we wanted a sink that stood out . Journey Collection by sinkology has made a difference in our everyday life routine . My moms life couldn’t be more happier . It’s one of those sinks thats is perfect in every way . And guess what ? With christmas around the corner Sinkology Jorney sink would make a perfect gift for your loved ones.


kitchen granite sink

Did I I mention how easy it is to clean ? No? Well I’m telling you now IT’S SUPER EASY TO CLEAN . I use two basic things water and Non-scratch scrubber . Sinkology scrubber help the sink to stay clean and beautiful . By the way if your picky like me about smells than you’ll love this product . The breeze non-scratch scrubber is lavender scented . This helps the scrub smell good even after cleaning a nasty sink.

SINKOLOGY BREEZE NON-SCRATCH SCRUBBERhttps://www.homedepot.com/p/SINKOLOGY-Breeze-4-8-in-Non-Scratch-Odor-Resistant-Silicone-Scrubber-SSCRUB-101/301306611

 
closer look at granite sink with faucet

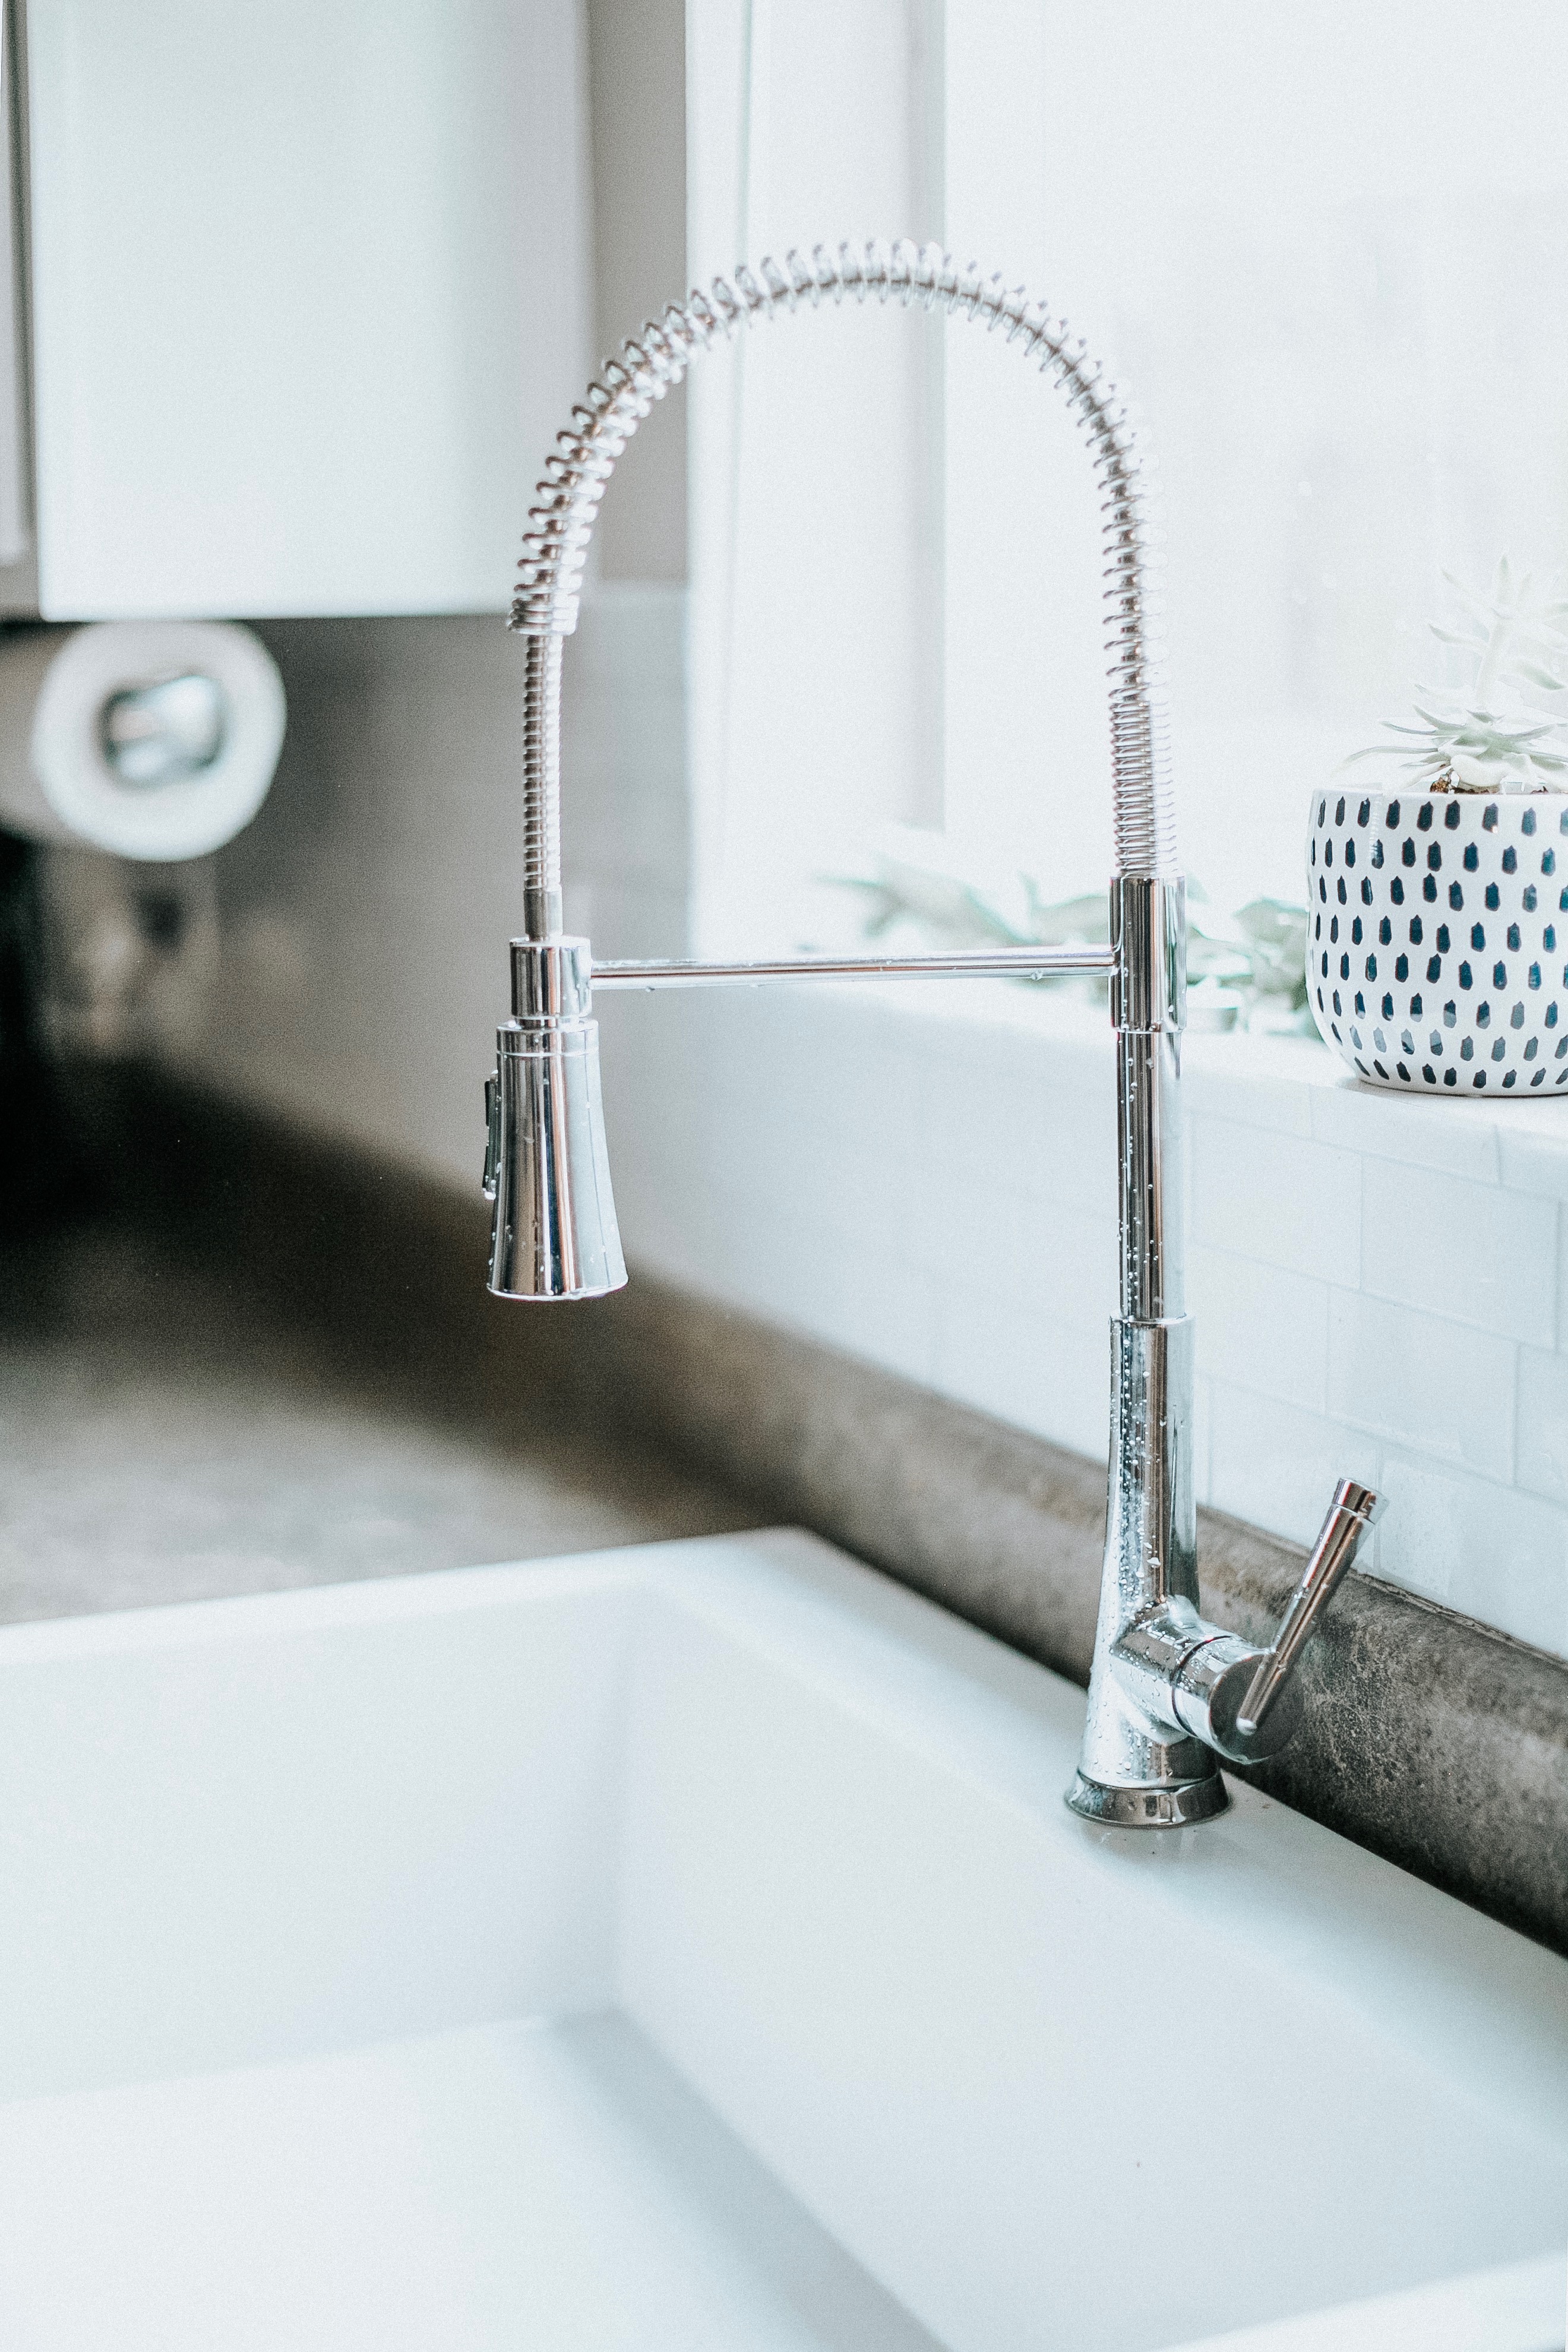
Pfister Zuri Faucet has been working out beautifully with our Sinkology sink . Im telling you it’s like peanut butter and jam . Two elements that must be together . Zuri Faucet is a single handle that can be easily controlled from cold to hot . It’s pull-down sprayer is amazing for quick dishes or fruits/vegetable rinses .

https://www.homedepot.com/p/Pfister-Zuri-Single-Handle-Pull-Down-Sprayer-Kitchen-Faucet-in-Stainless-Steel-LG529-MCS/206841749

Children washing their hands at the kitchen sink

Believe me this faucet and sink is not only for us parents but also a fun way to have kids entertained like 24/7.

Remember Happy Wife Happy Life . This sink made my life 100% happy which means Im a happy Wife 🙂 I enjoy spending more time in my kitchen now . Good quality and beautiful products make my cooking and cleaning job easier .

Mother washing hands at sink with child

For more information about Sinkology Journey collection visit http://www.sinkology.com/granite-composite-kitchen-sinks/


If you have any additional questions during your search for the perfect copper, fireclay farmhouse sink or granite sink, our Sinkologists are here to help. Contact us or follow us on FacebookHouzzPinterest, or Instagram for more helpful tips and design ideas.

The post The One Thing That Adds So Much Character appeared first on Sinkology.


source http://www.sinkology.com/blog/granite-sink-adds-character-to-this-home/

Friday, December 21, 2018

Decadent Liége Waffles Recipe

Sweet. Hot. Buttery. Rich. Doughy. Soft. Crunchy. Decadent Liége Waffles

Waffles

Liége waffles are indeed one of life’s great indulgences and they are certainly one of my family’s and mine. I tried my first one during college in Belgium of all places, the birthplace of Liége waffles. I didn’t even think to try to recreate them at home till years later and have been making them since.

Do not confuse them with the typical breakfast-y waffle batter. They are made with buttery-yeasted dough speckled with its trademark Belgium pearl sugar. They are delicious and best eaten hot and plain as a sweet treat, as they need no additional adornment. I personally think it would be a sacrilegious to put anything else on top!

Pearl sugar is an important component for authentic Liége waffles. Due to the compacted structure of the sugar crystals, the pearl sugar won’t completely dissolve inside the waffles. When the waffles are perfectly cooked in the waffle iron, the pearl sugar creates pockets of sweet and crunchy sugar on the inside and a caramelized and glossy sugar coating on the outside. Lars Belgian Pearl Sugar is the most common brand and generally found at most grocery stores or on Amazon.  

waffle ingredients

Waffle time! Pull out your stand mixer fitted with a paddle. They can be made without one but be prepared to give your arm a little workout. 

The post Decadent Liége Waffles Recipe appeared first on Sinkology.


source http://www.sinkology.com/blog/decadent-liege-waffles-recipe/

Cabin Kitchen Reveal With Our Sinkology Sink

Our friend Allison at Prvbsthirtyonegirl is renovating a small cabin on a lake. This is the reveal of their small kitchen renovations. Follow along with her blog at Proverbs31girl.com


I can’t believe that this moment is here.  Our little cabin renovations are finally starting to wrap up.  When we first bought this little cabin a year and a half ago, we thought we would just freshen things up, add paint, new lighting, and a few more updates and call it good.  And then we started digging in, and we realized that if we are going to do this cabin justice, it’s going to require a little more work than we thought.  And one of the biggest challenges we had were with the teeny tiny kitchen that it came with. 

The post Cabin Kitchen Reveal With Our Sinkology Sink appeared first on Sinkology.


source http://www.sinkology.com/blog/cabin-kitchen-reveal/

Tuesday, December 18, 2018

Tell-All with Yellow Prairie Interiors

What do you get when you combine an Oregon Trail pioneer with a modern-day interior designer? Yellow Prairie Interior Design’s headquarters and the homestead of its founder, Janna Allbritton! Janna and her husband Ryan have created a stunning farmhouse out of an 1890’s Italianette Victorian Home. Their dream was to renovate their home, and when it came to the kitchen, the sink was the shining star. Janna and Ryan knew they wanted a farmhouse sink, and they picked Sinkology’s single-bowl farmhouse style sink to showcase the simple, clean, cozy design they were looking for. The completed project is worth the visit, and we’re thrilled that Janna and Ryan opened their home to us for their home tour and of course we had a few questions for them along the way!

Settle in for a view of their warm and welcoming home and hear the passion and love that Janna and Ryan developed for their house as they transformed it into the farmhouse of their dreams. Janna is one of Sinkology’s favorite farmhouse interior designers (follow her at @YellowPrairieInteriors) and we’re honored that she took the time out of her business—and life!—to answer our questions and share her inspiration for design…and the ups and downs of a home renovation. Trust us—their advice is priceless for any family beginning the process of a renovation.


If you have any additional questions during your search for the perfect copper, fireclay farmhouse sink or granite sink, our Sinkologists are here to help. Contact us or follow us on FacebookHouzzPinterest, or Instagram for more helpful tips and design ideas.

The post Tell-All with Yellow Prairie Interiors appeared first on Sinkology.


source http://www.sinkology.com/blog/tell-all-with-yellow-prairie-interior-design/

Wednesday, December 12, 2018

Charm on the Farm: At Home with Yellow Prairie Interiors


White farmhouse known as Yellow Prairie Farmhouse

Janna Allbritton is the woman powering Yellow Prairie Interiors—one of our favorite interior designers to follow and a lover of the cozy farmhouse style that suits our INSPIRED collection of fireclay sinks perfectly! 

The post Charm on the Farm: At Home with Yellow Prairie Interiors appeared first on Sinkology.


source http://www.sinkology.com/blog/charm-on-the-farm-with-janna/

Tuesday, December 4, 2018

DIY Tub Tray

Our friend, Megan, over at Life on Shady Lane recently renovated her bathroom with one of our freestanding copper soaking tubs and a new copper bath sink all-in-one kit with Pfister faucet. She has been so grateful to share all the amazing details in this modern farmhouse bathroom renovation reveal!


A DIY tub tray makes your bathroom feel just like a spa, and is perfect for holding all of your bath essentials!

When we finished remodeling our modern farmhouse bathroom [here], I quickly realized that we needed a place to set bath essentials (a towel, candle, wine…duh, a book, etc.). I considered adding some sort of shelf next to the tub, but really didn’t want to detract from the tub’s beauty by putting a shelf directly next to it.

You know those fancy tub trays you always see in spas (or in magazines)? This tub was practically made for that. So we built one ourselves and I looove the way it turned out. Honestly, our bathroom feels just like a spa now! Now if only I could get someone to bring me cucumber water and a warm towel…

Materials Needed

(Click links below to see specific products we used)

  • Wood of your choice – we used a 2×12 common board, cut down to the width of our tub – of course you will want it to hang over the edges just a little bit! If you can’t cut it yourself at home, the hardware store you buy from will cut it for you.
  • Router
  • Mouse sander
  • Sandpaper
  • Polyurethane
  • Wood stain
  • Glaze coat

The post DIY Tub Tray appeared first on Sinkology.


source http://www.sinkology.com/blog/diy-tub-tray/

Sunday, December 2, 2018

Bradstreet ll Sink Review

Sinkology is proud to present Ashley Carpenter, a homebody, decor obsessed, DIYer that loves fitness, happy people and wants nothing more than to be on the lake soaking up the sun with good people and good music. Ashley runs the blog Joyfully Growing and is here to share a few tips, tricks and DIY projects that perfectly fit her farmhouse style.


Everything You Need to Know about the Fireclay Farmhouse Sink 

 After installing our new farmhouse sink a few months ago, I’m spilling all of my thoughts about the pros and cons in this fireclay farmhouse sink review! 

Bradstreet ll Review

If you followed along with our budget kitchen makeover, you know that adding a farmhouse sink to our kitchen was pretty much a dream come true. I’ve been pinning beautiful apron front sinks for years and finally got to have one of my very own! 

 Now that we’ve been able to use it for a few months I thought I’d share all of my thoughts on whether or not a farmhouse sink is REALLY all it’s cracked up to be.  

 Spoiler: it is. It really is! 

 Here’s everything you need to know about fireclay farmhouse sinks!  

We chose the Bradstreet II Fireclay sink from Sinkology. And can I just say – I LOVE this sink. Here’s a few reasons why: 

The post Bradstreet ll Sink Review appeared first on Sinkology.


source http://www.sinkology.com/blog/bradstreetll-sink-review/

Monday, November 12, 2018

Yam + Thyme Tarte Tatin

Sinkology is proud to present Emily Schuermann, our food-loving guest blogger who runs Food for a Year. Emily is here to share some recipes she has created exclusively for the Sinkology blog that reflect her view of a copper sink: simple, timeless, affordable, and beautifully rustic.


This year’s Thanksgiving table is going to make room for something a little different than our normal fare – a Yam and Thyme Tarte Tatin. Tarte Tatin is a fancy, French name for an upside-down, single-crust pie. Don’t you prefer the name “Tarte Tatin” over “Upside-Down, Single-Crust Yam Pie”?

Sure, the name may sound fancy, but this recipe is so simple – thanks to those handy frozen sheets of puff pastry dough!

Here’s what you’ll need to get started :: 

  • a 9″-10″ shallow skillet
  • one frozen puff pastry sheet thawed according to package instructions
  • 2 pounds peeled + sliced (½” thick) yam or sweet potato
  • brown sugar
  • fresh thyme
  • finely diced shallot
  • butter
  • ground cinnamon
  • sea salt 
  • black pepper
  • corn syrup (optional)

Start off by preheating your oven to 400°. Then, give the yams a head-start by placing the sliced yams into a medium pot of boiling water, allowing the yams to boil for 6 minutes.

Grease with butter (or spray with non-stick cooking spray) the sides of a  9″-10″ shallow skillet.

While yams are boiling, make a simple brown sugar caramel sauce in the bottom of a 9″-10″ skillet by melting butter and brown sugar together in the prepared skillet. Once the brown sugar is dissolved and bubbly, add thyme leaves, shallots, cinnamon, salt & pepper. (If desired, for extra gooeyness – add 2 T or corn syrup to the caramel mixture). 

Gently drain yam slices and arrange atop the brown sugar-thyme syrup. Roll out puff pastry sheet, just enough to smooth out the seams and lay over the top of the arranged yams. Using a sharp knife, cut several ½” venting slits in the puff pastry sheet.

Place the tarte tatin into a preheated oven and bake at 400° for 35-40 minutes, or until center is golden, crisp and puffed.

Once center is cooked through, remove from oven and allow to cool 5 minutes. After the tarte tatin has slightly cooled and sauce has slightly thickened, invert onto a serving platter.

yam-thyme-tarte-tatin

Slice and serve.

This Yam + Thyme Tarte Tatin is a real show-stopper for your Thanksgiving feast! Not only are the colors so reflective of Fall, but there’s a “magic-trick” quality that accompanies the “flip/inversion” step when plating this dish. Thanks to the key step of prepping the dish with non-stick spray and all the butter included in this recipe, the sliced yams are sure to release nicely from the bottom of the pan.

Then there’s the taste – herbed whispers of fresh thyme, paired with a hint of shallot contribute a subtle savory quality that helps to perfectly balance the sweetness of the yams and caramel sauce. While the crisp, buttery puff pastry adds the perfect textural contrast.

Whoever would think that a “yam dish” would outshine the turkey at Thanksgiving dinner?! Well, there’s a first time for everything and with this Yam + Thyme Tarte Tatin – this is bound to be the year!


If you have any questions during your search for the perfect copper sink, farmhouse fireclay sink or granite sink, our Sinkologists are here to help. Contact us or follow us on FacebookHouzzPinterest, or Instagram for more helpful tips and design ideas.

Yam + Thyme Tarte Tatin

  • 1 sheet frozen puff pastry ( thawed according to package instructions)
  • 2 lbs yam or sweet potato ( peeled + sliced (½" thick))
  • 1 c brown sugar
  • 4 T butter
  • ½ t fresh thyme leaves
  • 1 T shallot (finely diced)
  • 1 T ground cinnamon
  • ½ t sea salt
  • ¼ t black pepper
  • 2 T corn syrup ((optional)*)
  1. Preheat oven to 400°. Bring a medium pot of water to boil. Place sliced yam into boiling water, allowing to boil for 6 minutes.

  2. Grease with butter or spray with non-stick cooking spray the sides of a 9″-10″ shallow skillet.

  3. While yams are boiling, melt butter and sugar together in the prepared skillet. Once sugar is dissolved and bubbly, add thyme leaves, shallots, cinnamon, salt, pepper and corn syrup*.

  4. Gently drain yam slices and arrange atop the brown sugar-thyme syrup. Roll out puff pastry sheet, just enough to smooth out the seams and lay over the top of the arranged yams. Using a sharp knife, cut several ½” venting slits in the puff pastry sheet.

  5. Place the tarte tatin into a preheated oven and bake at 400° for 35-40 minutes, or until center is golden, crisp and puffed.

  6. Once center is cooked through, remove from oven and allow to cool 5 minutes. After the the tarte tatin has slightly cooled and sauce has slightly thickened, invert onto a serving platter.

  7. Slice and serve.

  8. Serves 8

*Corn syrup is optional, adding a slightly more gooey consistency to the brown sugar thyme sauce.

The post Yam + Thyme Tarte Tatin appeared first on Sinkology.


source http://www.sinkology.com/blog/yam-thyme-tarte-tatin/

Thursday, November 8, 2018

Fall Decor Tour

Welcome to our 2018 Fall Decor Home Tour! We have gathered three of our creative friends not only for a tour of their gorgeous homes, but to give us all some advice and tips on how to decorate. Join along as they go into detail of how to dress up each space for Fall. Make sure to check out each of their Instagram pages for more stunning inspiration and farmhouse decor. 


@SheGaveItAGo – Brendt 

She Gave It A Go is a dream of mine. It is a platform where I can empower and encourage the She Gave It A Go community with insights about faith, family, and farmhouse decor. I am a mom to four beautiful children and wife to a wonderful husband. I enjoy spending time with them in our home, volunteering at our church, and helping others by encouraging them to “give it a go” and chase their dreams in life. 


Happy fall! I’m so happy to have you join me on this part of the Sinkology Fall Home Tour.  I cannot wait to take you through four spaces of our home that are decorated for fall.  

I chose to decorate with neutrals such as creams, browns, whites, and grays. I also incorporated multiple textures and layers including metals, woods, fur, and wool. I did all of this with the goal of creating a timeworn and tattered look that is signature farmhouse style.

Come on in! Let’s get started.

The post Fall Decor Tour appeared first on Sinkology.


source http://www.sinkology.com/blog/fall-decor-tour-2018/

Friday, November 2, 2018

Apple Spiced Pumpkin Butter

Sinkology is proud to present Emily Schuermann, our food-loving guest blogger who runs Food for a Year. Emily is here to share some recipes she has created exclusively for the Sinkology blog that reflect her view of a copper sink: simple, timeless, affordable, and beautifully rustic.


In case you haven’t noticed (smirk) – we as a nation are well into “Pumpkin Spice Season”. Pumpkin Spice Season seems to last about six months out of the year — beginning with the start of Fall and stretching all the way through the last days of Winter.

To me, the best part of this pumpkin spice craze is not only the taste but also the warm spiced aroma filling the air.

This Apple Spiced Pumpkin Butter is not only crazy delicious and so easy to make, it also fills my home with the most glorious warm, sweet + spiced aroma that lingers and lingers and lingers.

To make this Apple Spiced Pumpkin Butter you’ll start with two large cans of packed pumpkin (not pumpkin pie filling – but just plain-old pumpkin).

Spoon the canned pumpkin into a 7 to 8 quart dutch oven and add the following :::

  • cinnamon sticks
  • allspice berries*
  • whole cloves*
  • star anise (optional)
  • ground cinnamon
  • candied ginger
  • dried oranges or orange rind
  • lemon zest + juice
  • brown sugar (light or dark)
  • apple cider (spiced or natural)
  • sea salt

*ground spices can be used in place of the whole allspice berries and cloves.

pumpkin-spice-butter

Give everything a good stir, cover and bake for 4-5 hours at 300°. After 4 hours, give the pumpkin butter a stir and taste test. Add additional sugar if desired. Bake an additional 30 minutes to 1 hour if you added additional sugar.

This recipe makes 7 half-pint jars of Apple Spiced Pumpkin Butter which can be stored in the refrigerator up to 6 weeks unopened or frozen for up to 6 months. If you are freezing, just be sure to leave 1″ headspace at the top of each jar for expansion before sticking the jars into the freezer.

Now for the best part – eating! You may be wondering “What do I do with pumpkin butter?” Well, the possibilities are limitless but here are some of my favorites ::

  • smear on toast or a warm biscuit
  • serve as a spread with cream cheese or goats milk cheese and crackers
  • swirl into your morning oatmeal or yogurt
  • use it in place of canned pumpkin pie filling (think pies, tarts, galettes)
  • add it your favorite sugar cookie recipe (reduce the fat proportionately) to make pumpkin spice cookies
  • swirl into the batter of your favorite brownie recipe
  • eat straight out of the jar!


Another bonus – this recipe makes enough to share! Think neighbor and teacher gifts or use as a stocking stuffer.

This smooth, buttery, sweetly spiced Apple Spiced Pumpkin Butter is versatile and yummy! It’s sure to be a star of the season!


If you have any questions during your search for the perfect copper sink, farmhouse fireclay sink or granite sink, our Sinkologists are here to help. Contact us or follow us on FacebookHouzzPinterest, or Instagram for more helpful tips and design ideas.

Apple Spiced Pumpkin Butter

  • 60 oz canned pumpkin – 2 large cans (not pumpkin pie filling)
  • 3 cinnamon sticks
  • 8 allspice berries*
  • 10 whole cloves*
  • 1 star anise ((optional))
  • 1 T ground cinnamon
  • 2" piece of candied ginger
  • 5-6 dried oranges or 1" pieces of orange rind
  • zest + juice of one lemon
  • 1 1/2 c packed brown sugar (light or dark)
  • 2 c apple cider (spiced or natural)
  • 1 t sea salt
  1. Place all ingredients into a 7 qt dutch oven. Stir to combine, cover and bake at 300° for 4 hours. Stir, taste and add additional brown sugar if desired. If added sugar, return to oven for 30 additional minutes. 

  2. Once cooking is done, remove and discard whole spices plus dried ginger and orange.

  3. To store, fill clean half-pint jars, leaving 1″ headspace. Cover and refrigerate up to 6 weeks or freeze up to 6 months. Once opened, use within 10 days.

  4. Makes 7 – half pint jars.

*can use 1 t ground allspice in place of the berries and 1/2 t ground cloves in place of the whole cloves.


The post Apple Spiced Pumpkin Butter appeared first on Sinkology.


source http://www.sinkology.com/blog/apple-spiced-pumpkin-butter/

Wednesday, October 24, 2018

20-minute Creamy Broccoli Cheddar Soup

Sinkology is proud to present Emily Schuermann, our food-loving guest blogger who runs Food for a Year. Emily is here to share some recipes she has created exclusively for the Sinkology blog that reflect her view of a copper sink: simple, timeless, affordable, and beautifully rustic.


One of the things I love most about my Sinkology farmhouse copper sink is it’s perfect balance of beauty and simplicity. It’s so easy to take care of– which may be surprising based it’s eye-catching charm. This gorgeous sink requires very little attention and provides so much beauty within the walls of my kitchen! It’s because of this, that this sink will always be one of my favorite things.

I’m always trying to add things to my life that satisfy my need for manageable, functional, uncomplicated, undemanding yet beautiful, timeless, eye-catchingly stunning design and my over-sized copper kitchen sink does just that.

And that brings me to our monthly Sinkology recipe :: 20-minute Creamy Broccoli Cheddar Soup!

It may surprise you to hear that a soup recipe can remind me of my copper sink, so let me explain why.

What’s more classic in the ‘creamy soup world’ than Broccoli Cheddar soup?

But if you’ve ever looked through broccoli cheddar soup recipes, you’ll quickly find out there are several steps to creating the perfect, velvety cream soup base. Likely, you’ll start off by making a roux, then alternate between adding ingredients and developing layered flavors in hopes of reaching creamy perfection. But these kinds of things take time and attention and I’m short on both – can you relate?

So, that’s why I’m sharing this modified, speedy Creamy Broccoli Cheddar Soup recipe with you! This recipe skips a few traditional steps without skimping on flavor or creaminess and (as it’s name says) comes together in 20 minutes.

To start, combine cream + butter + sea salt + crushed red pepper + black pepper + finely diced white onion in a medium soup pot over medium/medium-high flame. Bring the cream mixture to a low simmer, stirring occasionally (1-2 minutes). Reduce flame to medium/medium-low, add diced (1/2″ cubed) fresh cauliflower. Simmer for 10 minutes, continuing to stir occasionally. (NOTE :: The cream should NOT be boiling. Boiling without a roux in the base can cause the cream to break, yielding a grainy texture.)

While the cauliflower and cream mixture is at a LOW simmer, microwave frozen broccoli florets for 1-2 minutes (just until warm). Drain the warmed broccoli and chop into 1/2″ pieces. Add (chopped and drained) broccoli + dijon mustard to the cauliflower cream mixture. Reduce flame to LOW stirring continuously (1 minute) until broccoli is warmed through.

Next, add shredded sharp cheddar + shredded parmesan. Continue simmering and stirring continuously on LOW for 1-2 minutes (the soup should be simmering, NOT boiling). Remove from flame, cover and allow to sit for 5 minutes while cheeses continue to melt.  Stir and serve.

Thanks to the LOW flame and heavy cream + cheese, this quick soup’s classic velvety texture is on point. Plus, with the addition of red pepper flakes and a spoonful of dijon mustard, the resulting flavor dimension rivals (and really beats) traditionally time-consuming Creamy Broccoli Cheddar Soup recipes.

I hope you enjoy this delicious, satisfying and speedy soup and much as my family has and that the minutes saved in making this recipe will give you a chance to enjoy a “sit-down meal” in the midst of life’s busyness.

Oh, and two bonuses that come with this recipe ::

  • It’s gluten-free
  • It’s KETO friendly


If you have any questions during your search for the perfect copper sink, farmhouse fireclay sink or granite sink, our Sinkologists are here to help. Contact us or follow us on FacebookHouzzPinterest, or Instagram for more helpful tips and design ideas.


20-minute Creamy Broccoli Cheddar Soup

  • 8-10 oz heavy whipping cream
  • 3 T butter
  • 1/2 small white onion (finely diced)
  • 1 t sea salt
  • 1/2-1 t finely ground black pepper
  • 1/2 t crushed red pepper flakes (optional)
  • 10 oz frozen broccoli florets
  • 1-1/2 c fresh cauliflower, chopped (1/2" diced)
  • 1 T dijon mustard
  • 1 c shredded sharp cheddar cheese
  • 1 c shredded parmesan cheese
  • 1/2 c water (optional, to reach desired consistency)
  1. To start, combine cream + butter + sea salt + crushed red pepper + black pepper + finely diced white onion in a medium soup pot over medium/medium-high flame. 

  2. Bring the cream mixture to a low simmer, stirring occasionally (1-2 minutes). 

  3. Reduce flame to medium/medium-low, add diced (1/2″ cubed) fresh cauliflower. Simmer for 10 minutes, continuing to stir occasionally. (NOTE :: The cream should NOT be boiling. Boiling without a roux in the base can cause the cream to break, yielding a grainy texture.)

  4. While the cauliflower and cream mixture is at a LOW simmer, microwave frozen broccoli florets for 1-2 minutes (just until warm). 

  5. Drain the warmed broccoli and chop into 1/2″ pieces. 

  6. Add (chopped and drained) broccoli + dijon mustard to the cauliflower cream mixture. 

  7. Reduce flame to LOW stirring continuously (1 minute) until broccoli is warmed through.

  8. Next, add shredded sharp cheddar + shredded parmesan. 

  9. Continue simmering and stirring continuously on LOW for 1-2 minutes (the soup should be simmering, NOT boiling). 

  10. Remove from flame, cover and allow to sit for 5 minutes while cheeses continue to melt. 

  11. Stir and serve.

  12. Serves 4

* depending on desired consistency, you may wish to thin the soup slightly using water.


The post 20-minute Creamy Broccoli Cheddar Soup appeared first on Sinkology.


source http://www.sinkology.com/blog/20-minute-creamy-broccoli-cheddar-soup/

Tuesday, October 23, 2018

DIY Pumpkin Topiary

Sinkology is proud to present Kendra Williams, a home decor expert, DIYer, furniture refinisher, and busy mom as a guest blogger. Kendra runs the blog at Momtique and she is here to share some design ideas and inspiration around designing your home with copper and around your copper sink.


Fall is the best time of year. The weather is amazing and who doesn’t love the beautiful colors that accompany Autumn?!?! I absolutely love decorating with pumpkins. Through the years, fall decor options have evolved and greatly improved. It used to be that the only fake pumpkin color options I could find were bright orange. Since orange doesn’t really fit my style, I am happy to say that pumpkins have come a long way. You can find faux pumpkins in so many different colors, shapes, sizes, and textures. For years, I’ve gushed over pumpkin topiaries but they were never at the price point that made me feel comfortable. Seeing as I’m a thrifty, penny pincher, DIY kind of girl, I thought I would try a DIY pumpkin topiary.  As usual, I like to attempt and share DIYs that anyone can try. This topiary is easy, and might I add, so pretty! It would make a perfect fall centerpiece in a garden, on a patio, or even inside your home.  This project was a fraction of the price of a new topiary and you can use whatever pumpkin colors you would like. I, of course, chose white because it goes with everything and compliments my pastel decor.


What you’ll need to make a DIY Pumpkin Topiary

DIY-fall-pumpkin-topiary-supplies


– Three pumpkins of different sizes.

I decided to use faux pumpkins. I found them at a local craft store on sale for $10 each. When selecting pumpkins, I had to be certain I purchased the right sizes. I had to eyeball it and guess, to the best of my ability, if they would look good and work as a topiary. Usually, a pumpkin topiary goes from biggest on the bottom and then progressively gets smaller as it goes up. I decided to use a wide, but small in height, pumpkin for the base and then a large pumpkin in the center and then the smallest pumpkin on top.

– Bucket, basket, or container.

Measure the width of the bottom pumpkin and choose a bucket with an opening that is a few inches smaller than the pumpkin width. I was given a vintage 5-gallon crock from my father-in-law, which fit the topiary perfectly and gave it an antique look that I love.

– Hot glue and a hot glue gun.

– Moss or greenery between each pumpkin.

This touch of green is going to add character and dimension to the topiary. You don’t have to add greenery if you don’t want to, it’s completely up to your taste. If you do choose to add greenery, the possibilities are endless. Fall colored flowers would also look great between each pumpkin.

– Knife or box cutter.


How to make a Pumpkin Topiary

As I mentioned, this DIY is very easy and shouldn’t intimidate anyone. If I can do it, you can do it!

The post DIY Pumpkin Topiary appeared first on Sinkology.


source http://www.sinkology.com/blog/diy-pumpkin-topiary/

Thursday, October 11, 2018

Candy Corn Sheet Cake

Sinkology is proud to present Emily Schuermann, our food-loving guest blogger who runs Food for a Year. Emily is here to share some recipes she has created exclusively for the Sinkology blog that reflect her view of a copper sink: simple, timeless, affordable, and beautifully rustic.


Well, it’s officially ‘candy corn’ season (okay, some people may call it FALL)! The air has a slight chill, the trees are changing colors and the skies seem to be an even deeper blue against the reds and oranges of fall, and candy – specifically candy corn is popping at every turn!

It seems like there are two types of people :: the ones who LOVE candy corn and the ones who despise it. BUT, whether you give it a thumbs up or a thumbs down, I think we can ALL agree :: candy corn IS a Halloween staple. 

This month’s SINKOLOGY Halloween recipe gives us the PERFECT way to use up every last candy corn kernel while creating a simple cake that’s sure to please even the biggest scoffer. And,  I bet the way we’re going to use this candy will surprise you.

To start, place butter + water + candy corn in a medium saucepan over medium to medium high flame. Stir continuously until the butter and candy corn have melted and the liquid is at a low simmer.

Remove the candy corn mixture from the flame and add sour cream, mixing thoroughly.

In a medium bowl, combine flour + baking soda + sea salt. Give these dry ingredients a stir to evenly combine.

Whisk two eggs.

Add half of the dry ingredients to the candy corn mixture and stir to incorporate. Add half of the whisked egg mixture, continuing to stir. Add the remaining flour and stir. Finish off by adding the remaining egg, stirring to combine until the cake batter is smooth and free of lumps.

Pour the candy corn cake batter into a prepared 11″ x 16″ rimmed sheet pan and bake in a preheated 350° oven for 15-18 minutes or until the center is set.

While the cake is baking, prepare the stove-top buttercream by adding butter and milk to a medium saucepan. Over medium flame, melt butter and bring mixture to a low simmer. Remove the milk + butter mixture from the heat and add powdered sugar. Stir vigorously to remove lumps. Depending on the amount of evaporation that occurred while melting the butter, you may need to add additional milk or powdered sugar to reach your desired consistency.

Once the cake has finished baking, allow it to cool for 10 to 15 minutes before pouring the warm stove-top buttercream over the cake. Be careful while pouring the buttercream as you’ll likely have a little more icing than needed to cover the cake. If you pour it too fast, it may overflow!

Immediately after topping this candy corn cake with buttercream, top with seasonal sprinkles.

Now that we’ve discussed the mechanics of this recipe – let’s talk taste!

This cake has just the perfect level of sweetness, which may surprise you given how sweet candy corn is. The classic candy corn flavor is ever-so-slightly noticeable, making it certain to please all sides of the candy corn debate. 

And the color — bright orange, thanks to the melted candy corn! Such a fun, simple and unique way to celebrate the season.

You may be wondering if this unconventional sugar alternative causes the cake to have a weird texture. So let me satisfy your curiosity — this cake is moist, tender and buttery. The perfect texture for a perfect sheet cake. I may just start using candy corn in baking more often!


If you have any questions during your search for the perfect copper sink, farmhouse fireclay sink or granite sink, our Sinkologists are here to help. Contact us or follow us on FacebookHouzzPinterest, or Instagram for more helpful tips and design ideas.


Candy Corn Cake

  • 1 c water
  • 2 sticks butter (salted)
  • 10 oz candy corn (by weight)
  • 1/2 c sour cream
  • 2 eggs
  • 2 c flour
  • 1 t salt
  • 1 t baking soda

Stove-Top Buttercream

  • 1 stick butter (salted)
  • 1/3 c milk
  • 5 c powdered sugar

Decorations

  • Halloween sprinkles (optional)
  1. Preheat oven to 350° and prepare a 11″ x 16″ rimmed baking sheet.

  2. To start, place butter + water + candy corn in a medium saucepan over medium to medium high flame. Stir continuously until the butter and candy corn have melted and the liquid is at a low simmer.

  3. Remove the candy corn mixture from the flame and add sour cream, mixing thoroughly.

  4. In a medium bowl, combine flour + baking soda + sea salt. Give these dry ingredients a stir to evenly combine.

  5. Whisk two eggs.

  6. Add half of the dry ingredients to the candy corn mixture and stir to incorporate. Add half of the whisked egg mixture, continuing to stir. Add the remaining flour and stir. Finish off by adding the remaining egg, stirring to combine until the cake batter is smooth and free of lumps.

  7. Pour the candy corn cake batter into a prepared 11″ x 16″ rimmed sheet pan and bake in a preheated 350° oven for 15-18 minutes or until the center is set.

  8. While the cake is baking, prepare the stove-top buttercream by adding butter and milk to a medium saucepan. Over medium flame, melt butter and bring mixture to a low simmer. Remove the milk + butter mixture from the heat and add powdered sugar. 

  9. Stir vigorously to remove lumps. Depending on the amount of evaporation that occurred while melting the butter, you may need to add additional milk or powdered sugar to reach your desired consistency.

  10. Once the cake has finished baking, allow it to cool for 10 to 15 minutes before pouring the warm stove-top buttercream over the cake. Be careful while pouring the buttercream as you’ll likely have a little more icing than needed to cover the cake. If you pour it too fast, it may overflow!

  11. Immediately after topping this candy corn cake with buttercream, top with seasonal sprinkles.

The post Candy Corn Sheet Cake appeared first on Sinkology.


source http://www.sinkology.com/blog/candy-corn-sheet-cake/

Sunday, September 9, 2018

On Board with Design: Whitney Granite Sink in Graphite Gray

On Board with Design: Whitney Granite Sink in Graphite Gray

Granite-Sink-Design-Board

Sinkology just launched its new line of granite sinks and, if you’re anything like me, you’ll be in love!  The texture and tones of these sinks – which come in three colors – are amazing and sure to create an instant focal point in any kitchen.  To celebrate this new launch, I thought it would be fun to put together a design board to show one of the ways I’d style around a granite sink.

Whitney-Sink-in-Graphite-Gray

First up, I chose the Whitney sink in Graphite Gray.  I’m a huge fan of gray and decided it would be the perfect foundation for this neutral, modern farmhouse design board.  I wanted to move through the spectrum of lights and darks, so I paired the sink with this Pfister Kai Pull-Down Faucet in Matte Black.  The clean lines of the faucet have just enough flair and complement the gray tones of the sink.

kai-pfister-faucet-matte-black

I lightened things up a bit with a white ceramic Scandinavian Canister Set

Mint-Pantry-Scandinavian-Canister-Set

I love the honeycomb detailing off-set with natural wood lids.  The mix of materials feels right at home with the granite sink!  Speaking of mixed materials, this aptly named Marble and Wood Serving Board from Terrain features a combo of natural wood and marble.  The striped effect is right in keeping with this modern-feeling farmhouse design.  Subtle texture and pattern are always a win in my book!

Terrain-Marble-and-Wood-Serving-Board

No sink would be complete without some pretty and functional accessories! 

Abbot-Stripe-Hand-Towel

Picking up on the stripes and color palette we’ve got going, I think this Abbot Stripe Hand Towel from McGee & Co. is the perfect addition – either draped over the sink or hanging on a towel hook.  The Barr-Co. Hand Duo in Honeysuckle is icing on the cake, introducing a pretty pink hue (and intoxicating scent!) into the mix. 

Barr-Co-Hand-Duo

Finally, what room couldn’t use a pop of metallic?  I’m really loving the look of knurled pulls lately and these ones from Schoolhouse come in the perfect shade of natural brass.  Just the thing to add a little oomph to this sophisticated, but casual design! 

Schoolhouse-Knurled-Pull-Natural-Brass

How would you style your granite sink?  Let us know by sharing your ideas and tagging @Sinkology on Instagram!

The post On Board with Design: Whitney Granite Sink in Graphite Gray appeared first on Sinkology.


source http://www.sinkology.com/blog/color-inspiration-dark-greens-copy/

Thursday, September 6, 2018

Egg Roll Cups

Sinkology is proud to present Emily Schuermann, our food-loving guest blogger who runs Food for a Year. Emily is here to share some recipes she has created exclusively for the Sinkology blog that reflect her view of a copper sink: simple, timeless, affordable, and beautifully rustic.


In honor of the start of the College Football Season (BOOMER) – let’s talk tasty, tailgating, touchdown-watching food! There are a few key criteria that must be checked off in order for a recipe to be football party worthy, right?! 

It must be

  • indulgent
  • universally adored
  • simple
  • hand-held

With these in mind, I set out to recreate one of my all-time favorite snacks :: egg rolls. Egg rolls almost completely sweep my Game Day food checklist except for the fact that they aren’t very easy to make – like at all. Not only are they laborious, deep frying them leaves my kitchen covered in a greasy film. I don’t exactly mind working in the kitchen – but I sure hate making a giant greasy mess in my kitchen!

In order to preserve the characteristics that make an egg roll so deliciously crave-worthy, I created a quick filling made up of:

  • ground pork
  • fresh ginger
  • fresh garlic
  • carrots
  • celery
  • white onion
  • bell pepper
  • crimini mushrooms
  • cilantro
  • salt & pepper 
  • Korean style BBQ sauce

It sounds like a lot but it’s literally chop, dump, sauté and stir.


With the filling and flavors on point, I directed my attention to duplicating the crispy, crunchy egg roll wrapper. Determined to avoid the greasy mess, I decided to pre-bake the wrappers, forming them into  cups using a mini muffin tin. By placing square wonton wrappers in the mini muffin tin cups, brushing the edges with canola oil and baking for 6 minutes at 400°, the shells came out crisped to perfection. The perfect bite-sized vessel for the pork & veggie egg roll filling!

Fill the cups with 1-2 tablespoons of pork & veggie filling, garnish with a sprinkle of reserved veggies and serve! These Egg Roll Cups are a real crowd pleaser — savory with a hint of heat and sweet. And that wonton wrap is wonderfully crisp, sized perfectly for a two-bite handheld, mess-free game day snack!

With that – my Game Day snack food checklist is completely checked! All that’s left is to enjoy the perfect party food while cheering my team to victory!

Egg Roll Cups

  • 1 lb ground pork
  • 1/2" fresh ginger ( peeled and rough chopped)
  • 1 garlic clove (chopped)
  • 2 medium carrots (peeled and rough chopped)
  • 2 medium celery stalks (rough chopped)
  • 1/2 medium red bell pepper (rough chopped)
  • 2 c Napa cabbage
  • 1/2 small white onion
  • 3-4 crimini mushrooms (cleaned)
  • 6-8 sprigs fresh cilantro
  • 1 t sea salt
  • 1/2 t ground black pepper
  • pinch red pepper flakes ((optional, for added spice))
  • 4 oz Korean style BBQ sauce
  • 30 wonton wraps
  • 4 T canola oil
  1. Preheat oven to 400°.

  2. While the oven is heating, place wonton wraps in mini muffin tin (as pictured above). I prefer to leave a cup empty between each wrap so that the wonton wrap edges don’t touch.

  3. Brush the wonton wrap edges with a little canola oil for crisping.

  4. Bake wonton wraps for 6 minutes, remove from tin and allow to cool on a cooling rack. Continue baking wraps until you’ve got approximately 30 egg roll cups.

  5. While processing and baking the egg roll cups, place the ground pork into a preheated medium skillet over medium-high flame.

  6. Add ginger and garlic and continue cooking until the pork is browned and cooked through. Remove any large bits of ginger and garlic.

  7. Place veggies and cilantro in a food processor and pulse until finely chopped or finely chop veggies by hand. Reserve 2-3 tablespoons for garnish.

  8. Add veggie mixture to the pork and sauté 3-4 minutes over medium-high flame or until veggies are tender and liquid is mostly evaporated.

  9. Stir in BBQ sauce, heat through and remove from flame.

  10. Place approximately 1-2 T of pork mixture into each egg roll cup.

  11. Top with a sprinkle of reserved chopped veggies and serve.

  12. Makes approximately 30 egg roll cups.

Serving suggestions – make filling and egg roll cups up to 2 days ahead, refrigerate and reheat when ready to fill & serve egg roll cups. Another tip – if you have leftovers, these Egg Roll Cups reheat nicely. Simply reheat by placing filled cups on a baking sheet (every spaced) in a 400° preheated over for 4-5 minutes.


WP Recipe Maker #12259remove

Egg Roll Cups

Servings: 30

Author: Emily Schuermann, Food for a Year blog

– 1 lb ground pork

– 1/2″ fresh ginger peeled and rough chopped

– 1 garlic clove chopped

– 2 medium carrots peeled and rough chopped

– 2 medium celery stalks rough chopped

– 1/2 red bell pepper rough chopped

– 2 c Napa cabbage

– 1/2 small white onion

– 3-4 crimini mushrooms cleaned

– 6-8 sprigs fresh cilantro

– 1 t sea salt

– 1/2 t ground black pepper

– pinch red pepper flakes (optional, for added spice)

– 4 oz Korean style BBQ sauce

– 30 wonton wraps

– 4 T canola oil

1) Preheat oven to 400°. 

2) While the oven is heating, place wonton wraps in mini muffin tin (as pictured above). I prefer to leave a cup empty between each wrap so that the wonton wrap edges don’t touch. 

3) Brush the wonton edges with a little canola oil for crisping. 

4) Bake wonton wraps for 6 minutes, remove from tin and allow to cool on a cooling rack. Continue baking wraps until you’ve got approximately 30 egg roll cups.

5) While processing and baking the egg roll cups, place the ground pork into a preheated medium skillet over medium-high flame. 

6) Add ginger and garlic and continue cooking until the pork is browned and cooked through. Remove any large bits of ginger and garlic.

7) Place veggies and cilantro in a food processor and pulse until finely chopped or finely chop veggies by hand. Reserve 2-3 tablespoons for garnish. 

8) Add veggie mixture to the pork and sauté 3-4 minutes over medium-high flame or until veggies are tender and liquid is mostly evaporated.

9) Stir in BBQ sauce, heat through and remove from flame.

10) Place approximately 1-2 T of pork mixture into each egg roll cup. 

11) Top with a sprinkle of reserved chopped veggies and serve.

12) Makes approximately 30 egg roll cups.

Serving suggestions – make filling and egg roll cups up to 2 days ahead, refrigerate and reheat when ready to fill & serve egg roll cups. Another tip – if you have leftovers, these Egg Roll Cups reheat nicely. Simply reheat by placing filled cups on a baking sheet (every spaced) in a 400° preheated over for 4-5 minutes.


If you have any questions during your search for the perfect copper sink, farmhouse fireclay sink or granite sink, our Sinkologists are here to help. Contact us or follow us on FacebookHouzzPinterest, or Instagram for more helpful tips and design ideas.

The post Egg Roll Cups appeared first on Sinkology.


source http://www.sinkology.com/blog/egg-roll-cups/