On Board with Design: Whitney Granite Sink in Graphite Gray
Sinkology just launched its new line of granite sinks and, if you’re anything like me, you’ll be in love! The texture and tones of these sinks – which come in three colors – are amazing and sure to create an instant focal point in any kitchen. To celebrate this new launch, I thought it would be fun to put together a design board to show one of the ways I’d style around a granite sink.
First up, I chose the Whitney sink in Graphite Gray. I’m a huge fan of gray and decided it would be the perfect foundation for this neutral, modern farmhouse design board. I wanted to move through the spectrum of lights and darks, so I paired the sink with this Pfister Kai Pull-Down Faucet in Matte Black. The clean lines of the faucet have just enough flair and complement the gray tones of the sink.
I love the honeycomb detailing off-set with natural wood lids. The mix of materials feels right at home with the granite sink! Speaking of mixed materials, this aptly named Marble and Wood Serving Board from Terrain features a combo of natural wood and marble. The striped effect is right in keeping with this modern-feeling farmhouse design. Subtle texture and pattern are always a win in my book!
No sink would be complete without some pretty and functional accessories!
Picking up on the stripes and color palette we’ve got going, I think this Abbot Stripe Hand Towel from McGee & Co. is the perfect addition – either draped over the sink or hanging on a towel hook. The Barr-Co. Hand Duo in Honeysuckle is icing on the cake, introducing a pretty pink hue (and intoxicating scent!) into the mix.
Finally, what room couldn’t use a pop of metallic? I’m really loving the look of knurled pulls lately and these ones from Schoolhouse come in the perfect shade of natural brass. Just the thing to add a little oomph to this sophisticated, but casual design!
How would you style your granite sink? Let us know by sharing your ideas and tagging @Sinkology on Instagram!
Sinkology is proud to present Emily Schuermann, our food-loving guest blogger who runs Food for a Year. Emily is here to share some recipes she has created exclusively for the Sinkology blog that reflect her view of a copper sink: simple, timeless, affordable, and beautifully rustic.
In honor of the start of the College Football Season (BOOMER) – let’s talk tasty, tailgating, touchdown-watching food! There are a few key criteria that must be checked off in order for a recipe to be football party worthy, right?!
It must be
indulgent
universally adored
simple
hand-held
With these in mind, I set out to recreate one of my all-time favorite snacks :: egg rolls. Egg rolls almost completely sweep my Game Day food checklist except for the fact that they aren’t very easy to make – like at all. Not only are they laborious, deep frying them leaves my kitchen covered in a greasy film. I don’t exactly mind working in the kitchen – but I sure hate making a giant greasy mess in my kitchen!
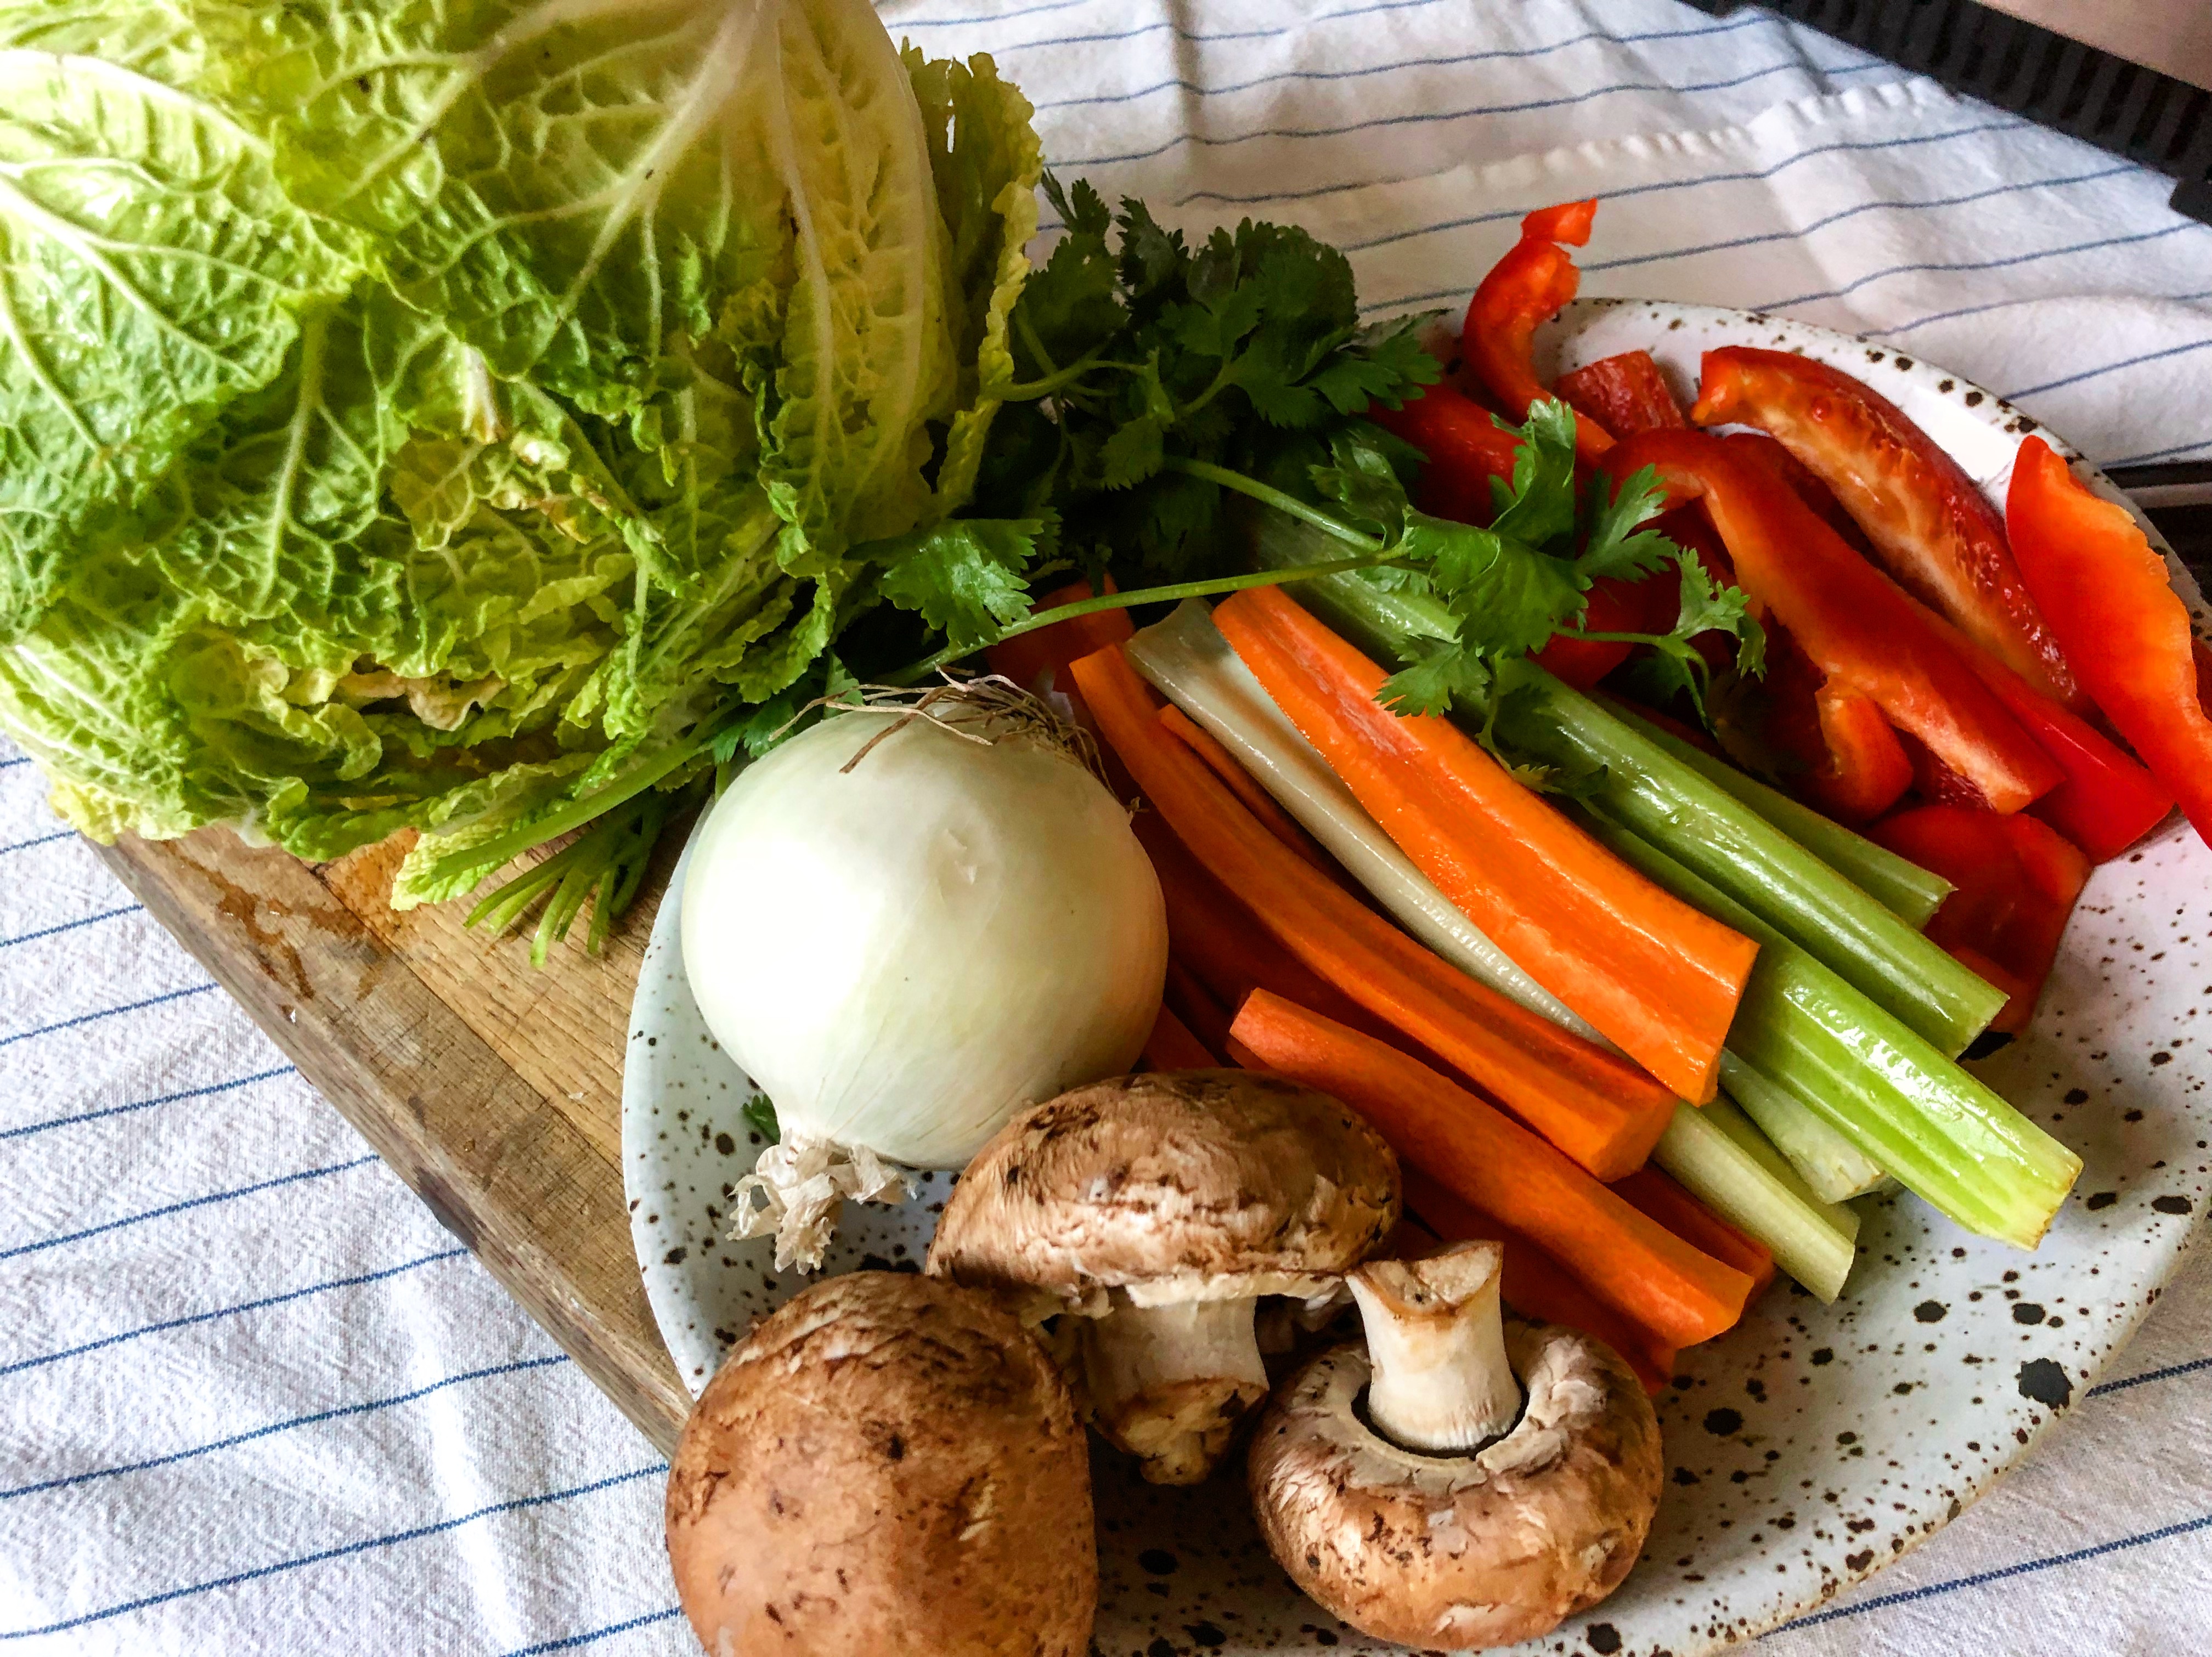
In order to preserve the characteristics that make an egg roll so deliciously crave-worthy, I created a quick filling made up of:
ground pork
fresh ginger
fresh garlic
carrots
celery
white onion
bell pepper
crimini mushrooms
cilantro
salt & pepper
Korean style BBQ sauce
It sounds like a lot but it’s literally chop, dump, sauté and stir.
With the filling and flavors on point, I directed my attention to duplicating the crispy, crunchy egg roll wrapper. Determined to avoid the greasy mess, I decided to pre-bake the wrappers, forming them into cups using a mini muffin tin. By placing square wonton wrappers in the mini muffin tin cups, brushing the edges with canola oil and baking for 6 minutes at 400°, the shells came out crisped to perfection. The perfect bite-sized vessel for the pork & veggie egg roll filling!
Fill the cups with 1-2 tablespoons of pork & veggie filling, garnish with a sprinkle of reserved veggies and serve! These Egg Roll Cups are a real crowd pleaser — savory with a hint of heat and sweet. And that wonton wrap is wonderfully crisp, sized perfectly for a two-bite handheld, mess-free game day snack!
With that – my Game Day snack food checklist is completely checked! All that’s left is to enjoy the perfect party food while cheering my team to victory!
Egg Roll Cups
1 lb ground pork
1/2" fresh ginger ( peeled and rough chopped)
1 garlic clove (chopped)
2 medium carrots (peeled and rough chopped)
2 medium celery stalks (rough chopped)
1/2 medium red bell pepper (rough chopped)
2 c Napa cabbage
1/2 small white onion
3-4 crimini mushrooms (cleaned)
6-8 sprigs fresh cilantro
1 t sea salt
1/2 t ground black pepper
pinch red pepper flakes ((optional, for added spice))
4 oz Korean style BBQ sauce
30 wonton wraps
4 T canola oil
Preheat oven to 400°.
While the oven is heating, place wonton wraps in mini muffin tin (as pictured above). I prefer to leave a cup empty between each wrap so that the wonton wrap edges don’t touch.
Brush the wonton wrap edges with a little canola oil for crisping.
Bake wonton wraps for 6 minutes, remove from tin and allow to cool on a cooling rack. Continue baking wraps until you’ve got approximately 30 egg roll cups.
While processing and baking the egg roll cups, place the ground pork into a preheated medium skillet over medium-high flame.
Add ginger and garlic and continue cooking until the pork is browned and cooked through. Remove any large bits of ginger and garlic.
Place veggies and cilantro in a food processor and pulse until finely chopped or finely chop veggies by hand. Reserve 2-3 tablespoons for garnish.
Add veggie mixture to the pork and sauté 3-4 minutes over medium-high flame or until veggies are tender and liquid is mostly evaporated.
Stir in BBQ sauce, heat through and remove from flame.
Place approximately 1-2 T of pork mixture into each egg roll cup.
Top with a sprinkle of reserved chopped veggies and serve.
Makes approximately 30 egg roll cups.
Serving suggestions – make filling and egg roll cups up to 2 days ahead, refrigerate and reheat when ready to fill & serve egg roll cups. Another tip – if you have leftovers, these Egg Roll Cups reheat nicely. Simply reheat by placing filled cups on a baking sheet (every spaced) in a 400° preheated over for 4-5 minutes.
WP Recipe Maker #12259remove
Egg Roll Cups
Servings: 30
Author: Emily Schuermann, Food for a Year blog
– 1 lb ground pork
– 1/2″ fresh ginger peeled and rough chopped
– 1 garlic clove chopped
– 2 medium carrots peeled and rough chopped
– 2 medium celery stalks rough chopped
– 1/2 red bell pepper rough chopped
– 2 c Napa cabbage
– 1/2 small white onion
– 3-4 crimini mushrooms cleaned
– 6-8 sprigs fresh cilantro
– 1 t sea salt
– 1/2 t ground black pepper
– pinch red pepper flakes (optional, for added spice)
– 4 oz Korean style BBQ sauce
– 30 wonton wraps
– 4 T canola oil
1) Preheat oven to 400°.
2) While the oven is heating, place wonton wraps in mini muffin tin (as pictured above). I prefer to leave a cup empty between each wrap so that the wonton wrap edges don’t touch.
3) Brush the wonton edges with a little canola oil for crisping.
4) Bake wonton wraps for 6 minutes, remove from tin and allow to cool on a cooling rack. Continue baking wraps until you’ve got approximately 30 egg roll cups.
5) While processing and baking the egg roll cups, place the ground pork into a preheated medium skillet over medium-high flame.
6) Add ginger and garlic and continue cooking until the pork is browned and cooked through. Remove any large bits of ginger and garlic.
7) Place veggies and cilantro in a food processor and pulse until finely chopped or finely chop veggies by hand. Reserve 2-3 tablespoons for garnish.
8) Add veggie mixture to the pork and sauté 3-4 minutes over medium-high flame or until veggies are tender and liquid is mostly evaporated.
9) Stir in BBQ sauce, heat through and remove from flame.
10) Place approximately 1-2 T of pork mixture into each egg roll cup.
11) Top with a sprinkle of reserved chopped veggies and serve.
12) Makes approximately 30 egg roll cups.
Serving suggestions – make filling and egg roll cups up to 2 days ahead, refrigerate and reheat when ready to fill & serve egg roll cups. Another tip – if you have leftovers, these Egg Roll Cups reheat nicely. Simply reheat by placing filled cups on a baking sheet (every spaced) in a 400° preheated over for 4-5 minutes.
If you have any questions during your search for the perfect copper sink, farmhouse fireclay sink or granite sink, our Sinkologists are here to help. Contact us or follow us on Facebook, Houzz, Pinterest, or Instagram for more helpful tips and design ideas.
People who dream big—and then make it happen—are on our short list of favorites. From seeing beautiful interior design to the weekend warriors who aren’t afraid to tear a few things apart, Sinkology finds inspiration in the creators of the world!
We recently had the pleasure of touring the recently renovated home of Liz, the woman behind the design Instagram account @DesertDecor. Liz invited us to see her new home (and her brand new Sinkology Fireclay Farmhouse kitchen sink!) and share her experience with us. Liz gave us great tips and shared the secrets to creating a kitchen as stunning as hers. Watch the video or read below for all the details! And don’t miss our recent Home Tour post with Liz, to see how she brings French farmhouse style to Arizona!
******
Hi Liz! Tell us a little more about yourself.
I’m Liz and I have a design Instagram account at Desert Décor. I design a home décor store here locally and in addition to that I teach a fitness class. Our home when we moved here to Phoenix, we had just a couple of days to find our location, went through tons of homes, tons of different areas in the Phoenix area and this one when we pulled in, it was the one. We just love our desert location, and I think we’ve been here about ten years now and I think we’re here to stay for a while.
What attracted you to the French Farmhouse style?
What drew me to the French farmhouse style, I think are just the vintage elements, I love all the chippy detail and the subdued colors. When you think of being in France, I think you think of relaxation and just, chillin’. And I love that feeling in my home…I just love a really relaxed feeling and subdued colors, and pieces in my home that have a story. So, that’s where the antiques and the French country kind of come in.
How long did it take to complete your kitchen renovation—and was the length of time more or less than you planned?
I don’t know any different; we’ve only renovated one kitchen, but it ended up being from the time we started it to the end about three weeks. So…the good part of what can make it go faster is a good kitchen designer. I felt like our designer at Space Home Outfitters, Sandra, she made an excellent effort to make sure everything was very timely. But it’s the prep work beforehand that really makes it go seamlessly. So we did a lot of prep work for about six months, coordinating all of our workers that came in.
How did you find the products for your new kitchen?
A lot of the products you’ll see in our kitchen, we wanted to make sure it was local companies that we worked with but also were accessible to my followers. That was really important to me so that they could grow their business as well. The cabinets, we ended up using Sollid Cabinetry, which is a local company here, but you can also order it even if you’re not local to Arizona. We also used Top Knobs for all of our knobs, and I loved their good variety that they have, and I feel like that’s added the real jewelry. Obviously, our Sinkology sink is one of my favorites. I’ve dreamed of a farmhouse sink since I was a little girl. It just, I feel, really sets the tone for our sink area in our kitchen. And we love it.
Where did you find inspiration for your renovation?
My heart kind of lies in Instagram, and so I wanted to be sure that all my inspiration came from Instagram. I know a lot of people go to magazines or Pinterest, but for me I feel like through searching hash tags, you can find everything you want. When we’re looking at sinks, we put in sinks in a hash tag and Sinkology came up. When we wanted to look at backsplash tile, whether we wanted herringbone versus classic, we just went to the hash tag search. So, a lot of people go to different sources, for us, most of our inspiration and what we wanted came just from Instagram.
How did you know which sink would work for your kitchen?
As far as farmhouse sinks, as we were deciding what kind of farmhouse sink would work best for our home, I really lended my opinion to be swayed by Sarah at Little Vintage Nest. And I’ll tell you why: she got the Sinkology farmhouse sink; I loved it in her home, I thought it was so beautiful. She did a beautiful detailed write-up blog post and it was all the facts and information you could ever want about fireclay. And reading that, I got goose bumps. I was sold. I just knew that that was a product for my home and number one importance wasn’t necessarily how it looked, but more durability, quality, and that’s what I found with Sinkology.
What features did you look for in your farmhouse sink?
When I was deciding on my farmhouse sink, I don’t think I wanted a great big bowl, although that’s a turn-on for most people who are looking for a farmhouse sink. I didn’t want to feel like I was scraping on all sides, I like to be able to wash and rinse in a separate sink. I had a really hard time actually, finding a double bowl farmhouse sink. I was so lucky to find Sinkology as they were starting to carry the perfect size: 33-inch, double bowl, they nailed it.
What did you love most about your Sinkology farmhouse sink?
What I liked most about the option with Sinkology farmhouse sink is that I had two design options. It was plain on one side, which we were originally going to use, and we, just fell in love with the design detail on the opposite side. But what I’ve been most happy about is it’s just so easy to clean. The durability has been great; we’ve banged on this, hot pots, I mean the works and it just holds up to everything we’ve put inside our sink. We’ve been really happy with it.
Was there anything you were nervous about in picking out your sink?
When we were shopping around for farmhouse sinks, I read tons of reviews, I did tons of research before I decided with Sinkology. And when I went to the other reviews I heard cracking and that scared me. That they would pour hot water into their fireplace sink and it cracked, there was chipping, and it had to be replaced over a year period of time, and I’m not okay with that. And I wasn’t going to take a chance on another company. What I love about Sinkology is they offered a lifetime guaranty on their sinks. To me that tells me they’re not selling me a hunk of junk, this is gonna last forever.
How did you begin your renovation? Did you start with anything in specific?
The very first material we had was our fireclay farmhouse sink from Sinkology, so everything else had to work around it. Our cabinet measurements, our accent marble, they did a fantastic job making sure that their template was just right to fit over top of the sink. We even put little decorative furniture legs under the sink to highlight the sink area. So yeah, that was definitely the heart of our kitchen. It was the first thing we started with in our kitchen design.
Would you recommend your Sinkology Fireclay Farmhouse kitchen sink?
If someone asked if I would ask recommend the Sinkology fireclay farmhouse sink, the answer is yes. We’ve been so happy with it and, in comparison to other competitors, I feel like this is top notch.
What was the biggest hurdle you faced in your renovation?
The biggest hurdle we came across is we had our counter tops all chosen, selected, tagged with our name on it, and a bigger project came in where they needed all of their quartz countertops. And so this company sold all of the slabs we had tagged which pushed our project back I’d say three or four weeks. And in a crazy world of jobs and coordinating other trades, it was hard. But we worked it out we worked with another company that we’ve been really happy with and we ended up getting our counter tops with MSI Stone, and we’ve been really happy with them.
Any advice for homeowners just getting ready to start a kitchen remodel?
If you were just thinking about designing a kitchen, and you didn’t know where to start, I would highly recommend a designer. I used to be scared of the word designer because I thought that meant a lot of added cost, but I’m telling you the return investment on that is so worth it. They have so many connections to different trades that you don’t have to worry about it and I feel that’s what made our kitchen go so seamlessly and in such a good time frame of three weeks, that’s unheard of for a kitchen. And so, a designer would be the way to go.
Whose design styles do you love?
The accounts that I love and that I look to the most anytime I need inspiration on Instagram is: Jessica @jesswasserman; Jamie @whitetailfarmhouse; and Lucy @birdiefarm. And the reason I love them is because there is nothing contrived about their house. When you go to their feed it is very them. You can tell they didn’t pop into a magazine and get the latest trends on what’s current. Its just things they love in their home and it feels so homey and so them.
What inspired this particular renovation?
Some inspiration I got when we were looking at kitchen renovations, and what we liked and didn’t like, there’s a feed that it’s Becky Owens. She doesn’t always design, it’s not always her home that she shares but she shares such good inspiration and there were so many fabulous things from kitchens that she shared. Like this tile design on our island, I got that from Becky Owen. The two toned, she really showcased that in such a magnificent way that’s what really drew us to the two tone.
What’s your next project now that your kitchen is complete?
Okay, so you asked about a list of projects we have coming up: we’re doing a brand-new staircase, which we’re really excited about. It’ll be wood stairs and new risers going in; we have an awesome custom barn door being made by Porter Barnwood that’s being installed; our pantry doors are getting a little refresh too, they’ll be antique doors I think from the 1800s that will be installed.
*****
If you are working on a kitchen renovation, be sure to check out all of the amazing resources from Sinkology to help you along the way. We curated a comprehensive Kitchen Sink Buying Guide to walk you step-by-step and decision-by-decision through the process of finding out exactly which sink will work best for your home and your family. If you’re looking for inspiration and design ideas, be sure to follow our blog and our Instagram account! We feature beautiful kitchens and bathrooms and we’re not afraid to show them off. Once you’re finished with your renovation, be sure to submit your new space to our #ShowUsYourSink program to receive your free gift. Happy renovating!
If you’re like us, you LOVE to see what’s going on in other people’s homes…especially when it comes to décor and design. We are so excited to share that Liz of @DesertDecor recently welcomed us to her Arizona home!
Liz’s home tour has everything you want—beautiful spaces, the secrets to her kitchen renovation, and advice on how to get started creating an inspiring space in your own home. The video captures the calm beauty of her French farmhouse style, a sunny oasis in the desert. From unexpected details (hello, seed bag detail on the couch!) to her sparkling new Sinkology Fireclay Farmhouse kitchen sink, we loved everything about Liz’s recent renovation.
Liz sat down with our Sinkology team to give us all of the background details about her kitchen renovation, including one major setback and how she handled it. Let’s just say this: you’re definitely going to want to read her upcoming Q&A!
Get all of the details about who she follows to find inspiration, what her number one piece of advice is for your own remodeling project, and how she’s enjoying her new kitchen. Stay tuned for the full interview—only on the Sinkology blog! Launching next Tuesday so come back and check it out!
Sinkology is proud to present Emily Schuermann, our food-loving guest blogger who runs Food for a Year. Emily is here to share some recipes she has created exclusively for the Sinkology blog that reflect her view of a copper sink: simple, timeless, affordable, and beautifully rustic.
Cooking and August are two things that don’t exactly go together, at least in my kitchen. This time of year, I’m always looking for ways to cook without really cooking. For instance, for lunches and dinners, we’re eating a lot of salads with freshly picked veggies and cut up supermarket rotisserie chicken or a simple sandwich. Pretty boring, I know! But with temperatures peaking at 114°, August in Oklahoma is all about surviving.
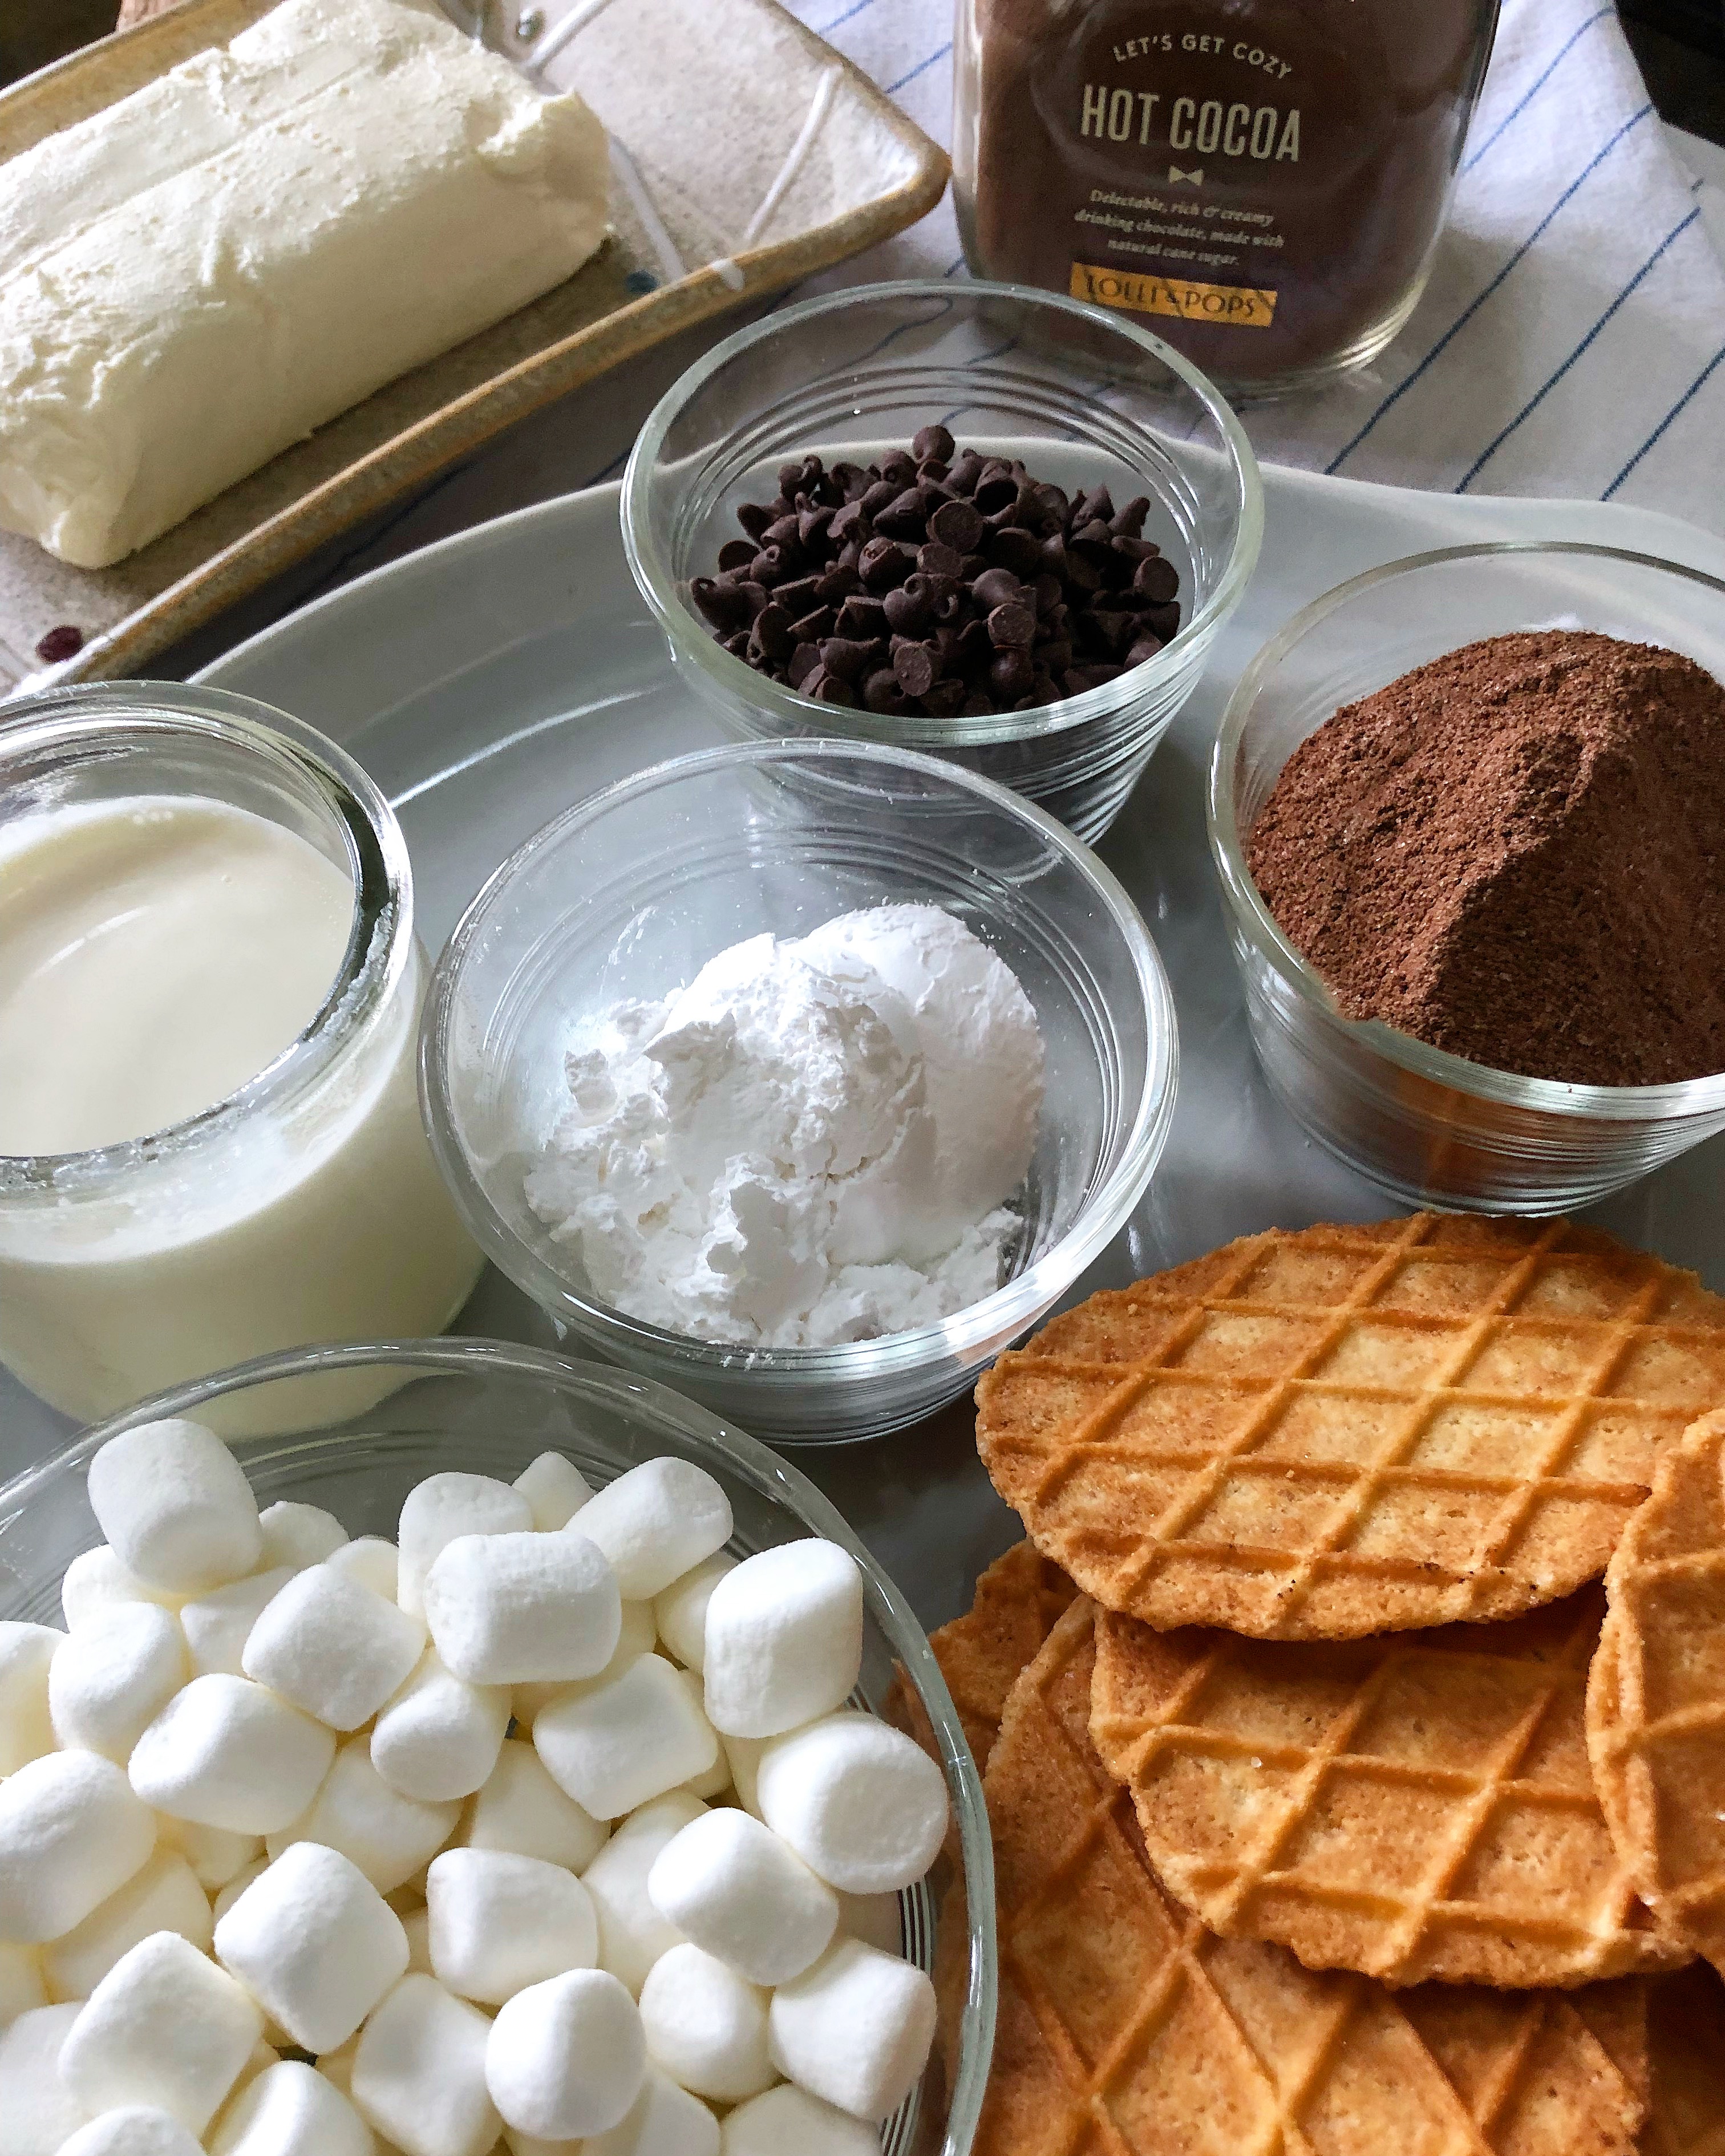
Here’s what you’ll need:
heavy whipping cream
powdered sugar
sea salt
cream cheese
powdered hot chocolate
mini marshmallows
mini chocolate chips
large, thin store-bought cookies
To prepare the frozen hot chocolate ice cream, combine heavy whipping cream, powdered sugar and sea salt using a hand-mixer. Once soft peaks that hold their shape form, add cream cheese and powdered hot chocolate.
Continue mixing on high speed, occasionally scraping sides and bottom, until evenly incorporated.
Fold in marshmallows.
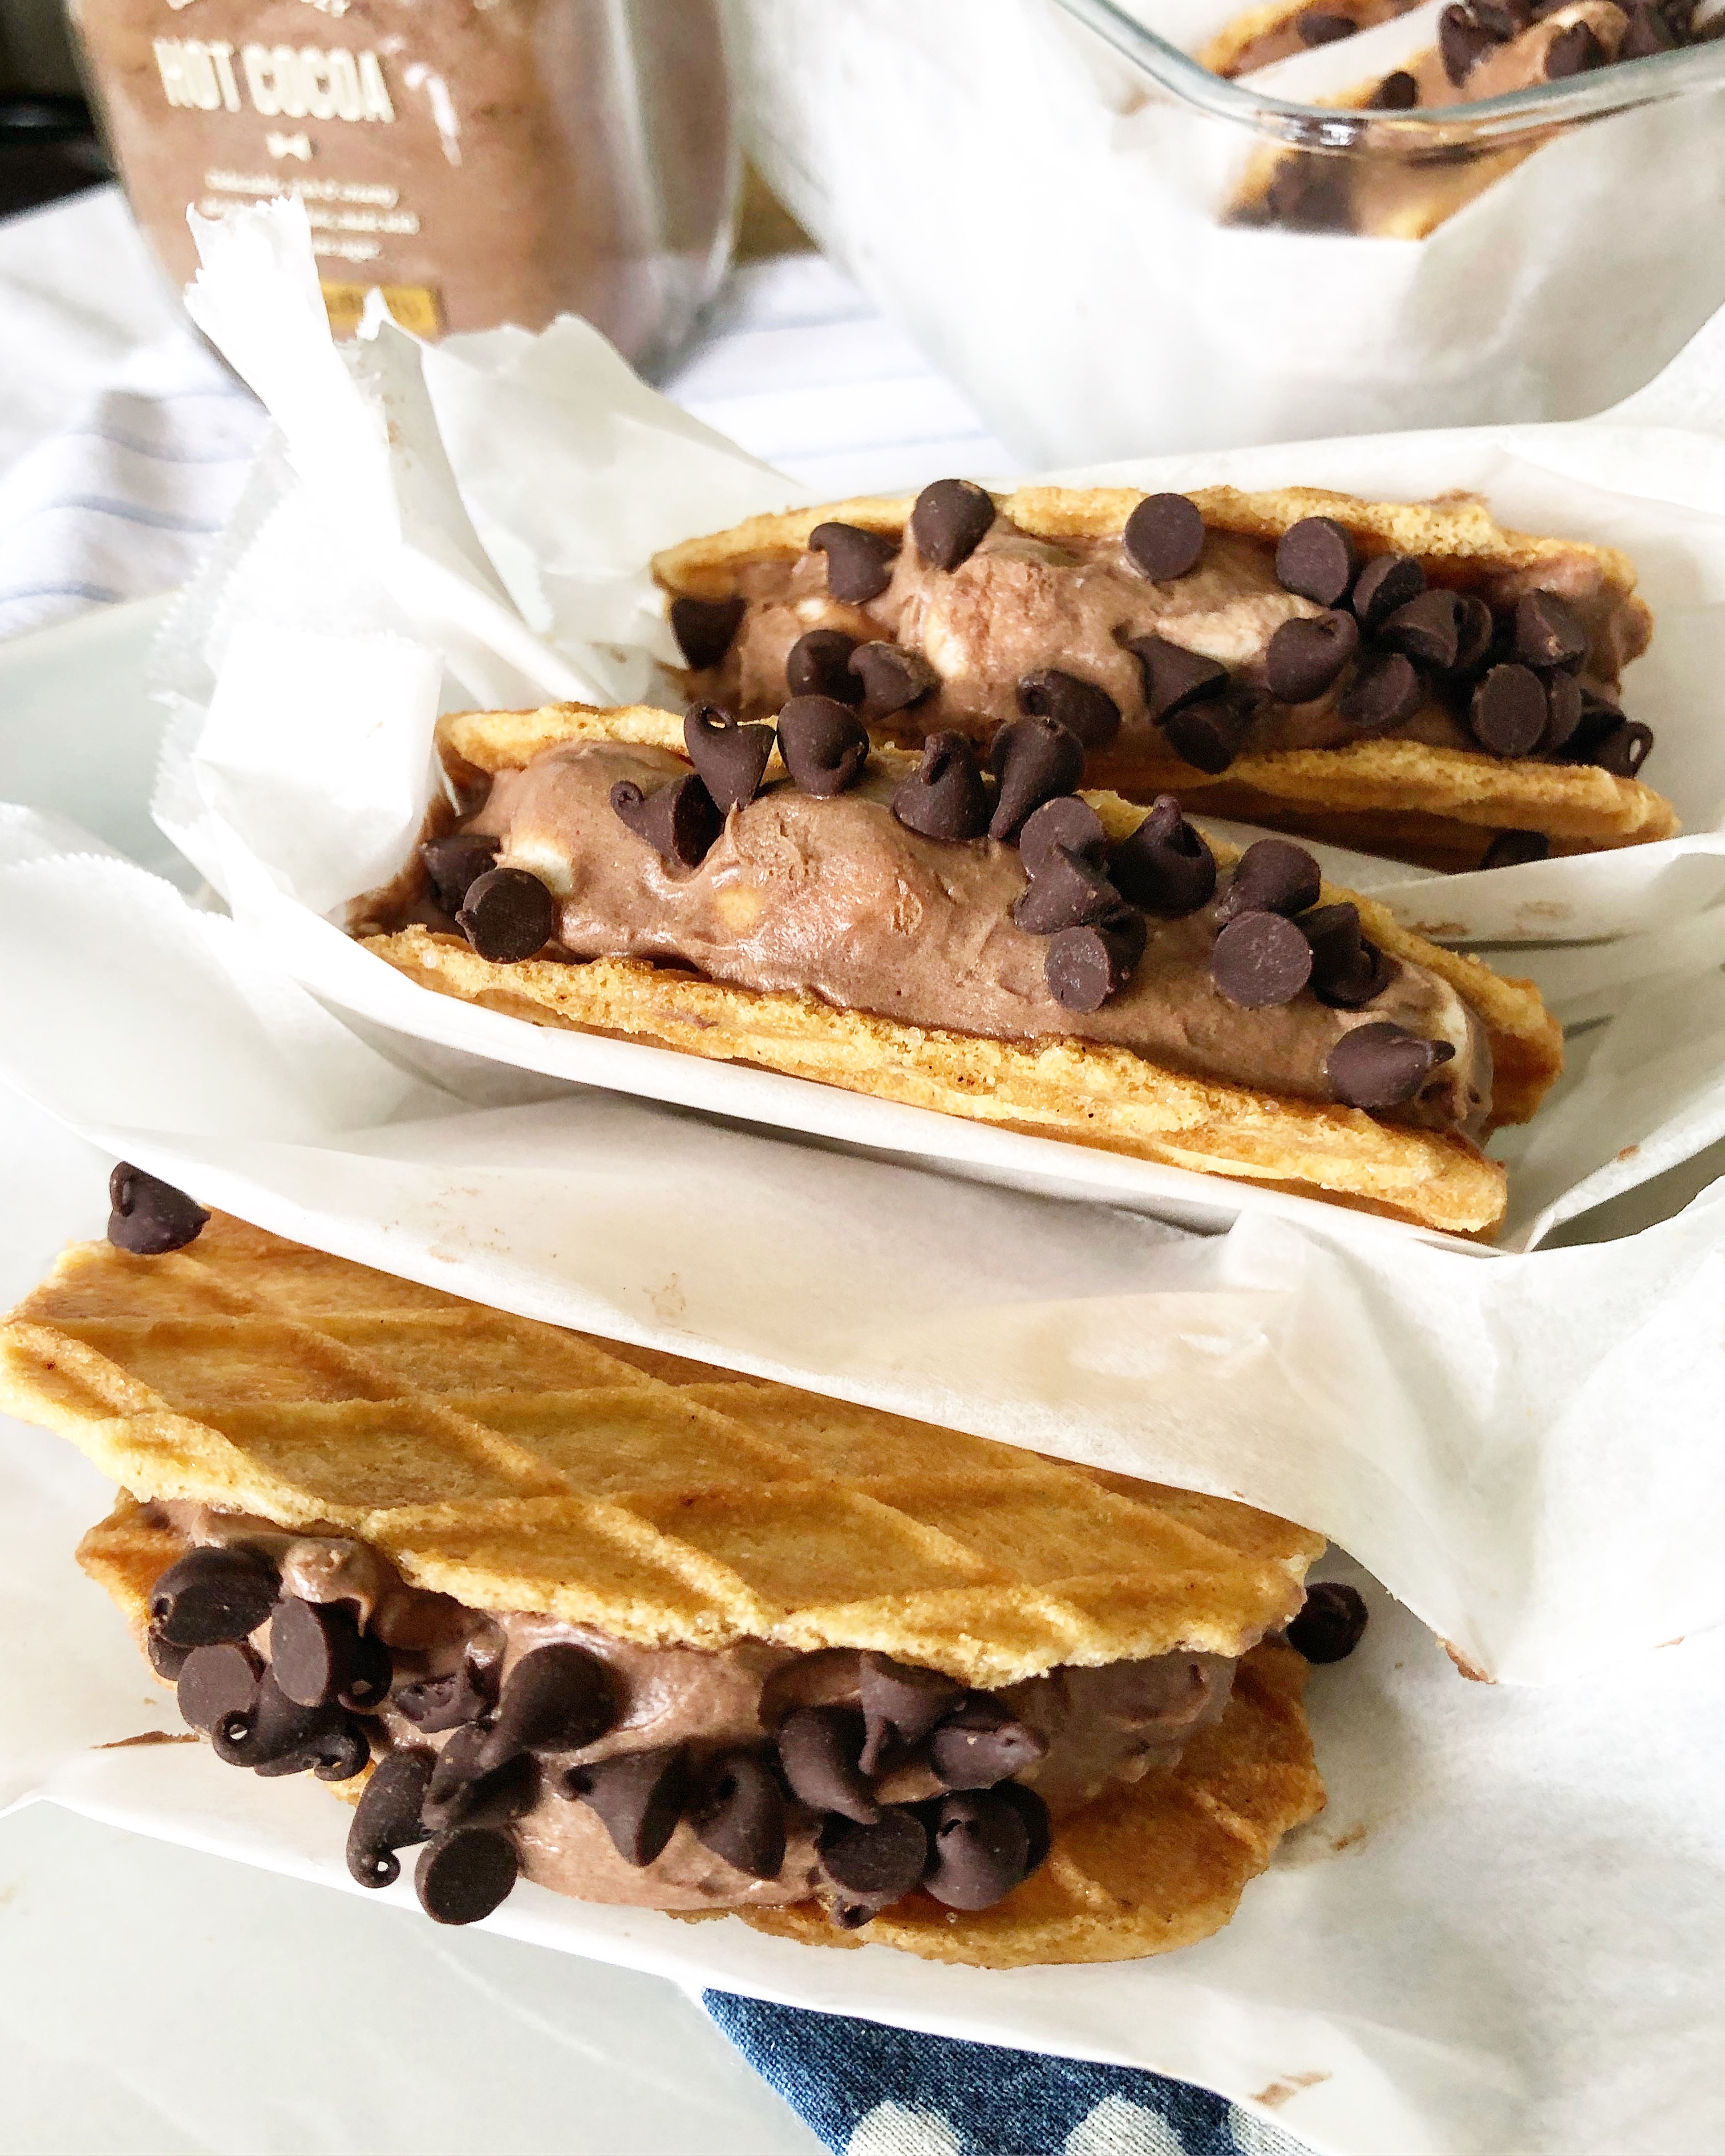
Using a 2 oz scoop, place 1 scoop of hot chocolate ice cream in the center of 1 cookie. Place another cookie on the top of the ice cream and gently press to a thickness of 1″.
Repeat until all sandwiches (6) are formed.
Wrap each sandwich with parchment paper and place side up in a glass, freezer safe container. Freeze 2 hours up to over night.
*sprinkle with mini chocolate chips before placing in the freezer.
These ice cream sandwiches are just what the doctor ordered! Cool, chocolatey and so quick to assemble. That first bite of marshmallow laden frozen hot chocolate flavored ice cream is so satisfying. I think it’s just enough to get me to September!
If you have any additional questions during your search for the perfect copper sink, farmhouse fireclay sink or granite sink, our Sinkologists are here to help. Contact us or follow us on Facebook, Houzz, Pinterest, or Instagram for more helpful tips and design ideas.
In a medium mixing bowl, combine cream, powdered sugar and sea salt using a hand-mixer. Once soft peaks that hold their shape form, add cream cheese and powdered hot chocolate.
Continue mixing on high speed, occasionally scraping sides and bottom, until evenly incorporated.
Fold in marshmallows.
Using a 2 oz scoop, place 1 scoop of hot chocolate ice cream in the center of 1 cookie. Place another cookie on the top of the ice cream and gently press to a thickness of 1".
Repeat until all sandwiches (6) are formed.
Wrap each sandwich with parchment paper and place side up in a glass, freezer safe container. Freeze 2 hours up to over night.
Makes 6.
Notes
*sprinkle with mini chocolate chips before placing in the freezer.
**for this recipe, I used Trader Joes Butter Waffle Cookies but any cookie with a diameter of approximately 3" will work nicely.
Sinkology is proud to present Ashley Carpenter, a homebody, decor obsessed, DIYer that loves fitness, happy people and wants nothing more than to be on the lake soaking up the sun with good people and good music. Ashley runs the blog Joyfully Growing and is here to share a few tips, tricks and DIY projects that perfectly fit her farmhouse style.
Eeeek! I am so incredibly excited to share our budget kitchen makeover reveal with you today!
I’ve never been more excited in all my life to cook and do the dishes.
Ever since moving into this house, I’ve been looking forward to giving our kitchen a little face-lift. And while I’d love to give it a complete overhaul and pick out the fanciest of finishes to make my Pinterest dream kitchen come to life, that just isn’t in the budget right now. So instead, we selectively chose a few updates that we knew would give us the most bang for our buck! And I couldn’t be happier with the end result. Note: the complete budget breakdown is listed at the bottom of the post!
But what’s a good reveal without a quick look back at what it looked like before?
Here’s what the kitchen looked like on the day we moved in:
It had a weird greenish-greige paint color, an awkwardly sized refrigerator, and a whoooole lotta wood cabinets & wood trim. Add in the fact that there aren’t any windows, and it’s basically the perfect combination to create a dark and gloomy space. Ewww…
But, it’s come a long way since then and today I’m spilling all the details that went into this budget kitchen makeover. Ready to see how it all turned out?
I present to you….*drumroll*…. our kitchen makeover reveal!
OUR WOOD AND WHITE KITCHEN REVEAL
A huge thanks to Sinkology for providing products for this space! This post contains affiliate links, please see my disclosure here for more information.
Come on in and let me give you a little tour and share about each of the changes we added to this space.
These countertops will stand up to everyday scratches and wear with similar durability to that of natural stone, but with a price tag that won’t break the budget. This was really important to us when deciding on a countertop material.
What really sold me on these countertops, though, was the fact that they are extremely low maintenance. Not only do they have a high resistance to stains, chemicals and heat, but I love that this material is non-porous. Read: easy to keep clean! Because, I’m not gonna lie… I am terrible when it comes to re-applying sealants and waxes!
No need for any of that with these beauties!
FARMHOUSE SINK
Speaking of beauty, let me introduce you to my favorite part about our kitchen makeover: our new farmhouse sink!
Pretty much since the day I discovered Pinterest, I’ve been dreaming of one day owning a farmhouse sink. And let me just tell you, this sink has lived up to those dreams and more!
This all-in-one sink kit was generously provided by Sinkology. The all-in-one kit includes a fireclay apron front sink, a Pfister pull down faucet, and a couple of sink accessories like a metal grid for the bottom of the sink and a matching drain stopper.
Not only is it gorgeous, but I absolutely love the functionality it provides. The giant, single basin sink really is so easy to use and dare I say that it makes washing dishes actually enjoyable?!
I love that the fireclay sinks by Sinkology are tough, durable and easy to maintain. All it takes is a little soap and hot water to keep this thing looking spotless!
Pretty flowers help too.
The sleek pull down Pfister faucet creates the perfect blend of modern and traditional for the space. It’s easy to use and the pull down faucet makes rinsing out the sink so easy.
We are loving it!
SUBWAY TILE BACKSPLASH
You may have caught a glimpse of our new backsplash behind the sink – subway tile! I decided to go with white subway tile to pull in more light finishes to help brighten up the kitchen. And since the countertops were a solid white, we went with a medium grey grout to give it some contrast.
Subway tile is such a classic style that I feel will look good in this space for years to come. Mike and I did the whole installation ourselves (ok, mostly Mike – but I provided moral support ).
It was no easy task, but in the end I think it turned out wonderfully!
Sinkology is proud to present Ashley Carpenter, a homebody, decor obsessed, DIYer that loves fitness, happy people and wants nothing more than to be on the lake soaking up the sun with good people and good music. Ashley runs the blog Joyfully Growing and is here to share a few tips, tricks and DIY projects that perfectly fit her farmhouse style.
Even though our Pinterest feeds are about to be taken over by pumpkin spice everrrrythang, most of us still have another few weeks of sizzlin summer heat. So to cool you down with a little extra kick, I want to share my go-to summer cocktail recipe.
This cucumber watermelon moscow mule recipe is super easy to whip up on a whim, because let’s face it – when it comes to sippin’ on a refreshing drink on a hot day, ain’t nobody got time for complicated!
Cucumber Watermelon Moscow Mule Recipe
Ingredients:
½ cup of fresh cut watermelon
1 lime, juiced
4 ounces of watermelon flavored vodka
Ginger beer to top off cocktail (about 4oz per mug)
½ medium cucumber, sliced
Watermelon wedges, for garnish
Mint, for garnish
Sliced cucumber, for garnish
Ice
Instructions:
1. Fill two copper mugs with ice. Set aside.
2. Add the watermelon and lime juice to a mason jar and break down with a wooden muddler or spoon until it looks like pulp.
3. Add crushed ice to the jar, cover tightly with lid and shake vigorously. Strain into the prepared copper mugs, dividing between the two.
4. Add 2 ounces of vodka to each mug and top off each with ginger beer and cucumber slices. Stir to combine.
5. Garnish with watermelon wedge, cucumber slice, and mint.