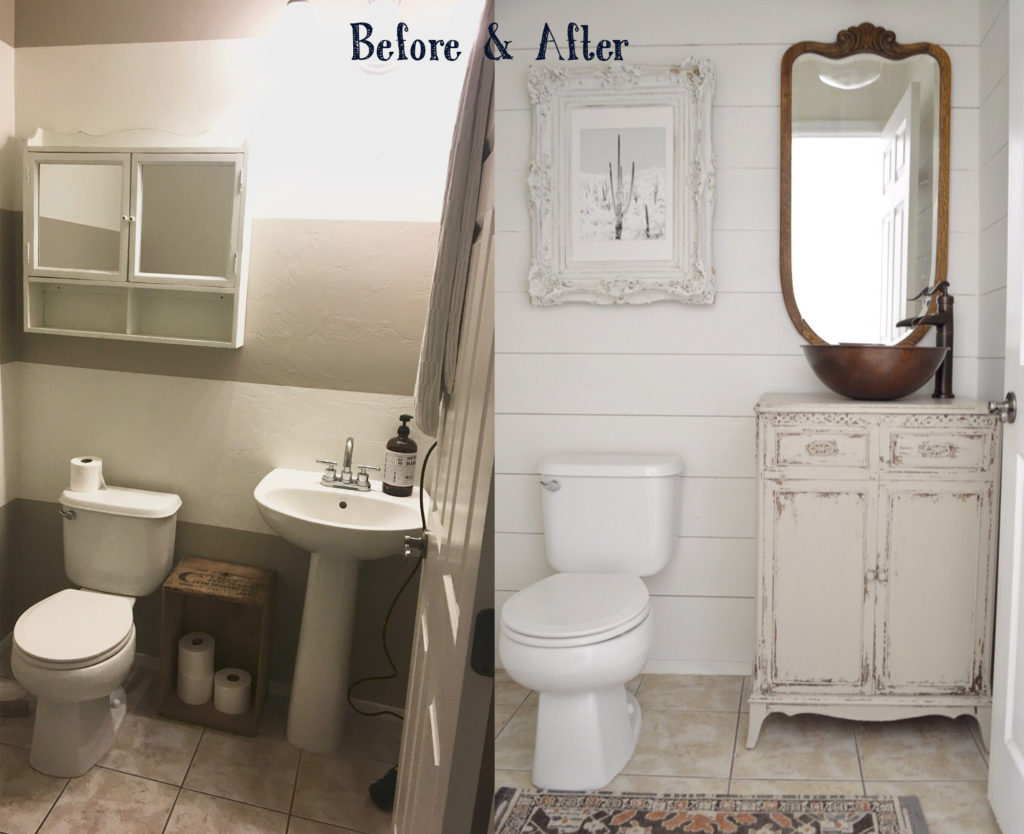
Natalie from My Vintage Porch is here to share with us her recent little powder room reno! She started her blog to share projects, DIY tutorials, budget-friendly decor, and home decorating ideas. She loves everything home decor AND, of course, projects! She loves to see the before and afters, and to step back, take a deep breath, and see what all of her hard work has brought to fruition! This recently updated bathroom with our Eddington Copper Vessel All-In-One Kit doesn’t disappoint!
It’s been a long time waiting for this project to be done and we still need to finish the floors but it’s mostly finished! I am so excited to share this project with you! I have always wanted to change this space up but didn’t want to spend a lot of money. If you followed along my journey on my Instagram stories, thank you! It’s so fun to have you along! I will recap the process here and how we managed to revamp this space on a budget.
This is the before and after. I was tired of the stripes and ready for a change. I have also always wanted some sort of furniture piece for a vanity in place of this pedestal sink. I went on a big hunt and finally found this piece at a local antique store. It’s an old record cabinet and it fit my space perfectly! I actually can’t believe that I found something to fit this small space so perfectly.
While I was in search of a cabinet for a vanity, I started “shiplapping” the walls using plywood. You can see the whole process here of how I shiplap walls with plywood.
Plywood is so much more budget friendly than shiplap and I love the texture that it adds to a space. The width of shiplap used depends on the space between the floor/trim to the ceiling. We used 7-7/16″ width for our walls. I also filled in the gaps in the corners with joint compound before I painted the walls. The color I used on the walls is Benjamin Moore White Dove.
My hubs cut out the area inside of the record cabinet for pipes to fit before I painted the cabinet.
I painted the cabinet with Milk Paint, 1 part White Fig and 1 part Sweet Cream. It chipped a little too much the first time around so I just sanded it down a lot and repainted, and now it’s perfect. I absolutely love it! After using an oil/wax sealer, I didn’t feel that it was sealed good enough for water use around the top. So, I decided to use water based polyacrylic to seal the cabinet. I lightly sanded the cabinet with 100 grit sandpaper and sealed it with 2 coats of the matte water based polyacrylic. I feel much better having sealed it with poly, I think it will hold up better to water messes that I know are coming in here.
The post Before & After: Powder Room Renovation with @MyVintagePorch appeared first on Sinkology.
source http://www.sinkology.com/blog/before-after-powder-room-renovation/

No comments:
Post a Comment